
In the previous sections, you started Minecraft on port 25565 and Terraria on port 7777 of the machine's own address, namely one address that every server shares. To give each server an address of its own, you'll first order routed IPv4 addresses from Taipan Transit and end their tunnel on the machine.
The reasons for doing so are practical. A routed address stays the same when the machine's own address changes, so players never need a new address. It also works for a machine at home behind carrier-grade NAT, where no public address exists to forward a port from, a situation that Why CGNAT Stops You Hosting a Server at Home explains in detail. And it gives every server the default port its players expect, so the second Minecraft server does not need a port number in its address.
Decide What the Public Addresses Expose
Once an address is public, everything that listens on it answers the whole internet, and the machine runs more than game servers. The panel's web interface, Wings, and the machine's own SSH service all listen on every address, and a routed address counts as one of them from the moment it appears. A test from the far end of the tunnel, before any firewall rule existed, reached SSH on port 22, the panel on ports 80 and 443, and Wings on ports 8080 and 2022 through the routed address, together with the game port.
Nothing on that list should be public except the game. The setup below therefore publishes only the ports that game servers use, and it drops everything else that arrives through the tunnel. The panel and Wings stay reachable at their own domains, which use the machine's normal address.
Doesn't the game server's own port setting already limit what the address exposes?
It limits which game ports exist, and nothing more. The panel, Wings, and SSH are separate programs that listen on their own ports, and only a firewall decides which sources may reach them.
Order Routed IPv4 Addresses and a Tunnel
Ordering starts in the Taipan panel: choosing a tunnel type opens that product's configuration screen, with a term, the number of IPv4 addresses, and a traffic tier. This guide uses two addresses, one for the Minecraft server and one for the Terraria server, and more addresses can join the same tunnel later. WireGuard is the tunnel type to pick for a machine whose own address may change, because a peer proves its identity with a key pair and keeps working after the address changes. GRE vs. WireGuard compares the options, the hosting platform guide walks through the order screens, and the WireGuard tunnels page lists what each plan includes.
After the order completes, the panel shows the routed addresses, the WireGuard endpoint to connect to, Taipan Transit's public key, and the UDP port. The examples below use addresses from the documentation range 203.0.113.0/24, so replace them with the values from your own order:
endpoint: 203.0.113.9
routed:   203.0.113.17
          203.0.113.18
Terminate the Tunnel on the Machine
A WireGuard tunnel is an ordinary Linux interface, so the machine needs the WireGuard tools and a key pair. The public half goes to Taipan Transit when you register your side of the tunnel, and the private half never leaves the machine:
apt install -y wireguard-tools
install -d -m 700 /etc/wireguard
sh -c 'umask 077; wg genkey | tee /etc/wireguard/taipan.key | wg pubkey > /etc/wireguard/taipan.pub'
cat /etc/wireguard/taipan.pub
Then write /etc/wireguard/wg0.conf. It is longer than the tunnel files in the other guides, because game servers run in containers and the machine must also protect itself. The next lines make a complete file, and the paragraphs after it explain each group of lines:
[Interface]
PrivateKey = <contents of /etc/wireguard/taipan.key>
Address = 100.64.0.2/32
Table = off
PostUp = ip address add 203.0.113.17/32 dev lo
PostUp = ip address add 203.0.113.18/32 dev lo
PostUp = ip rule add from 203.0.113.17/32 table 20 priority 100
PostUp = ip rule add from 203.0.113.18/32 table 20 priority 100
PostUp = ip route add default dev %i table 20
PostUp = iptables -t mangle -A PREROUTING -i %i -m conntrack --ctstate NEW -j CONNMARK --set-mark 0x20
PostUp = iptables -t mangle -A PREROUTING ! -i %i -m connmark --mark 0x20 -j CONNMARK --restore-mark
PostUp = ip rule add fwmark 0x20 table 20 priority 99
PostUp = iptables -I INPUT -i %i -j DROP
PostUp = iptables -I INPUT -i %i -p icmp -j ACCEPT
PostUp = iptables -I INPUT -i %i -m conntrack --ctstate RELATED,ESTABLISHED -j ACCEPT
PreDown = ip rule del fwmark 0x20 table 20 priority 99
PreDown = iptables -D INPUT -i %i -m conntrack --ctstate RELATED,ESTABLISHED -j ACCEPT
PreDown = iptables -D INPUT -i %i -p icmp -j ACCEPT
PreDown = iptables -D INPUT -i %i -j DROP
PreDown = iptables -t mangle -D PREROUTING ! -i %i -m connmark --mark 0x20 -j CONNMARK --restore-mark
PreDown = iptables -t mangle -D PREROUTING -i %i -m conntrack --ctstate NEW -j CONNMARK --set-mark 0x20
PreDown = ip rule del from 203.0.113.17/32 table 20 priority 100
PreDown = ip rule del from 203.0.113.18/32 table 20 priority 100
PreDown = ip address del 203.0.113.17/32 dev lo
PreDown = ip address del 203.0.113.18/32 dev lo

[Peer]
PublicKey = <Taipan's public key, from the panel>
Endpoint = 203.0.113.9:51820
AllowedIPs = 0.0.0.0/0
PersistentKeepalive = 25
The Addresses and the Routing Table
The Address line uses 100.64.0.2 from the shared range 100.64.0.0/10, so the tunnel interface itself costs no public address, the same choice as in the other guides. Table = off stops wg-quick from replacing the machine's own default route, which still has to leave through the normal uplink for everything else. The two ip address add lines put the routed addresses on the loopback interface, which makes the machine accept packets for them. Docker also refuses to publish a port on an address the machine does not own: starting a game server's container without its routed address fails with failed to bind host port 203.0.113.17:25565/tcp: cannot assign requested address.
The ip rule and ip route lines build a second routing table, number 20, with one default route through the tunnel. A packet whose source is a routed address uses that table, so a reply leaves through the tunnel while ordinary outbound traffic is untouched.
The Return Path for Containers
Those source-address rules are enough for a program running directly on the machine, which is the case in the NAS and hosting platform guides. They are not enough for a game server in a Docker container. A connection to a published port still gets in, but the container's reply is never delivered, and the player sees a connection that times out.
Why do container replies miss the tunnel?
Because of the order in which Linux handles a packet. The container sends its reply from its own private Docker address, the routing decision happens at that moment, and only afterward does Docker rewrite the source back to the routed address. By then the choice of route has already been made, so a rule that matches the routed source address never sees the packet, and the reply leaves through the normal uplink. The three CONNMARK and fwmark lines fix this. The first marks every new connection that arrives through the tunnel, the second copies that mark onto replies before the routing decision, and the rule with fwmark 0x20 sends marked packets to table 20.
The Firewall for the Machine Itself
The three iptables -I INPUT lines protect the machine's own services. They drop everything that arrives on the tunnel interface and is addressed to the machine itself, except replies to connections the machine started and ping. Docker's published ports are not affected, because traffic for a container passes through the forwarding path and never reaches the INPUT chain. The panel, Wings, and SSH stay reachable through the machine's normal address, where they already were.
Before editing wg0.conf again: make sure the tunnel is down. To check, run ip link show wg0, which should report that the interface does not exist, and run wg-quick down wg0 first if it does, because wg-quick reads the PreDown lines from the file as it is now. After adding an address to the file while the tunnel was up, the next wg-quick down tried to delete an address the running tunnel never had, stopped halfway, and left rules behind.
Start the Tunnel at Boot
Enable the tunnel so it comes back after a reboot, and make Wings wait for it. Wings restarts the servers that were running before a reboot, and a server whose routed address is missing at that moment fails with the bind error described earlier. A small drop-in file for the Wings service puts the tunnel first:
systemctl enable wg-quick@wg0

mkdir -p /etc/systemd/system/wings.service.d
cat > /etc/systemd/system/wings.service.d/after-tunnel.conf <<'EOF'
[Unit]
[email protected]
[email protected]
EOF
systemctl daemon-reload
After a full reboot of the test machine, Wings restarted both game servers by itself, the tunnel was up, and the routed addresses were back on the loopback interface.
Bring the Tunnel Up and Check the Return Path
Start the tunnel and look at its state. A working tunnel lists the peer, the endpoint, and a latest handshake a few seconds old. A peer with no handshake means the packets are not reaching Taipan Transit, so compare the endpoint, the public keys on both sides, and the UDP port before looking anywhere else:
wg-quick up wg0
wg show wg0
ip route get 1.1.1.1 from 203.0.113.17
The last command asks the kernel where a packet from the routed address would go. The answer must name the tunnel and table 20:
1.1.1.1 from 203.0.113.17 dev wg0 table 20 uid 0If the answer names the machine's normal interface instead, the policy rules are not in place, and ip rule shows which of them are missing.
Give the Addresses to the Panel
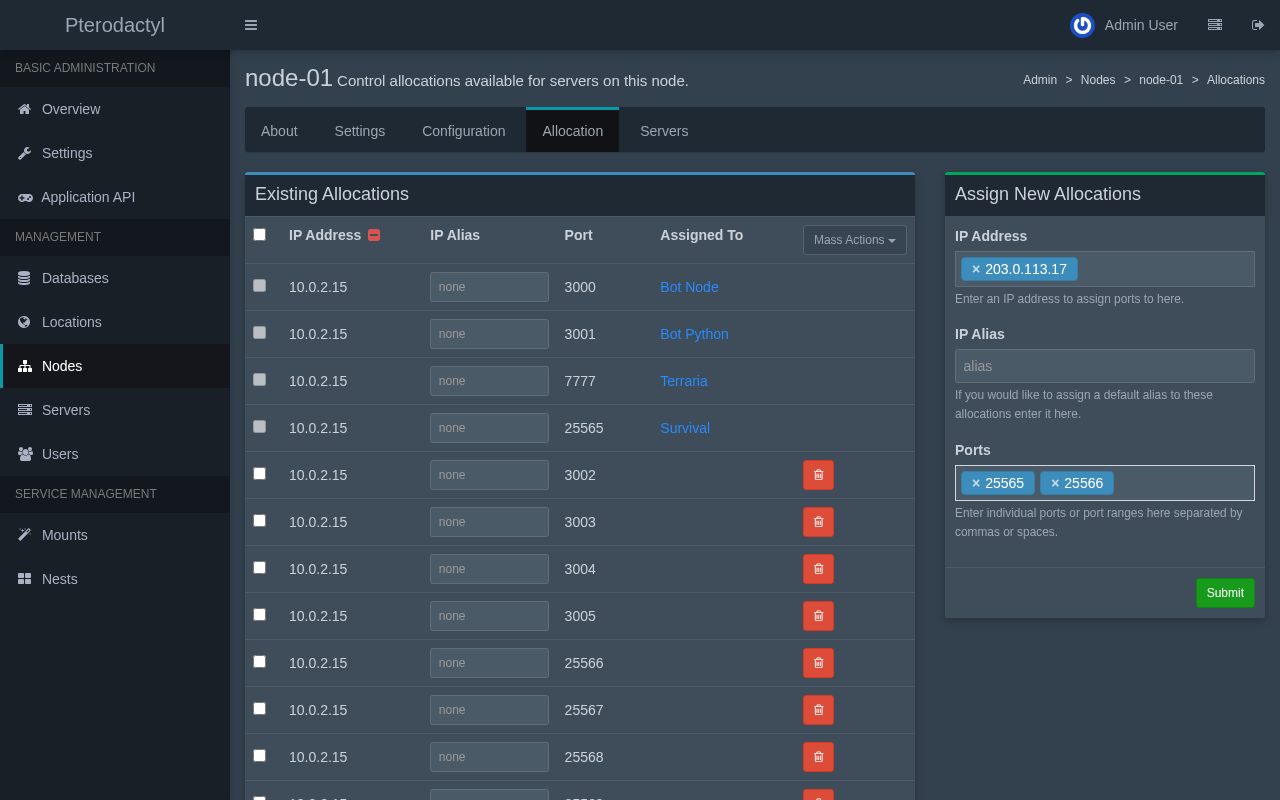
The panel hands out only the addresses you create as allocations, so the routed addresses go on the node first. Open the node's Allocation tab and add 203.0.113.17 with the ports 25565 and 25566, and 203.0.113.18 with the port 7777. Each routed address carries the port of the game it serves.
Move a Server to Its New Address
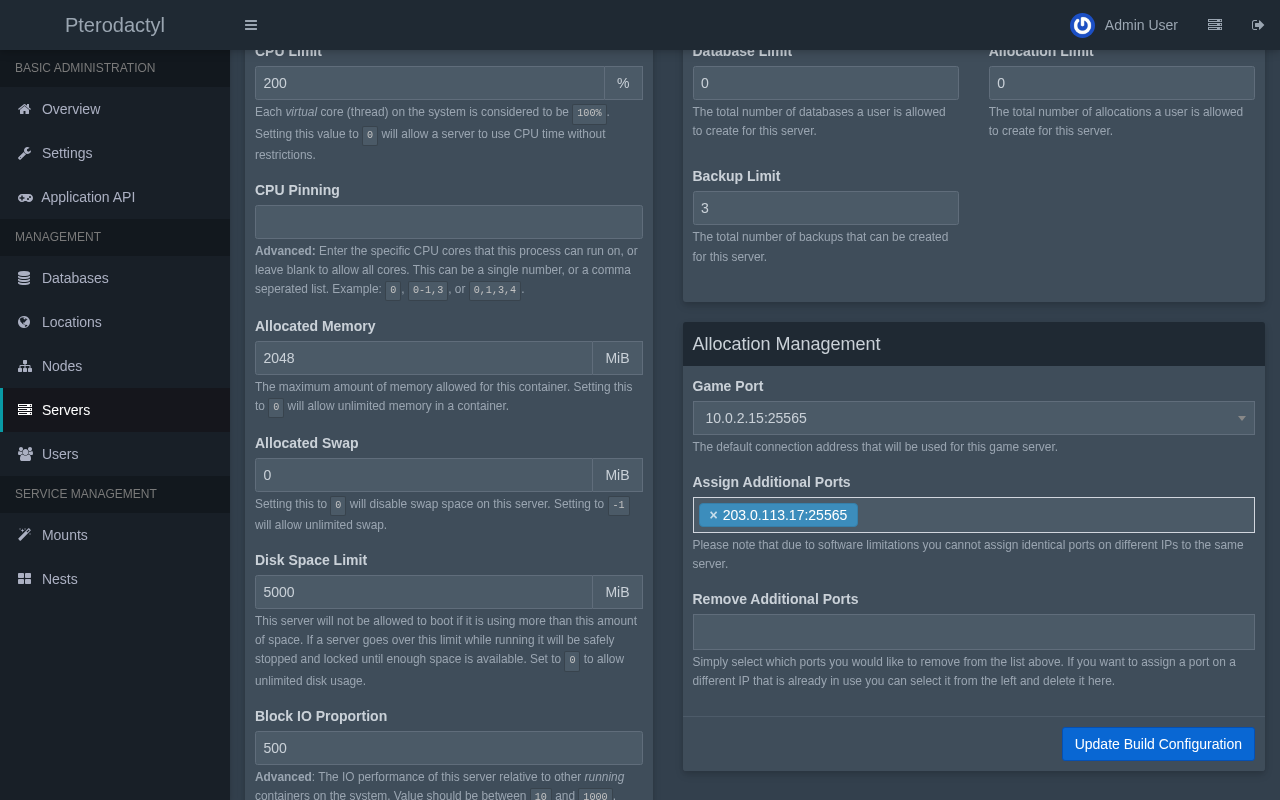
A server has one primary allocation, the one players use. To move the Minecraft server, open it in the admin area, then its Build Configuration tab. This takes two saves, because the panel does not allow one server to hold the same port on two different addresses at once. First, add the new allocation under Assign Additional Ports and save.
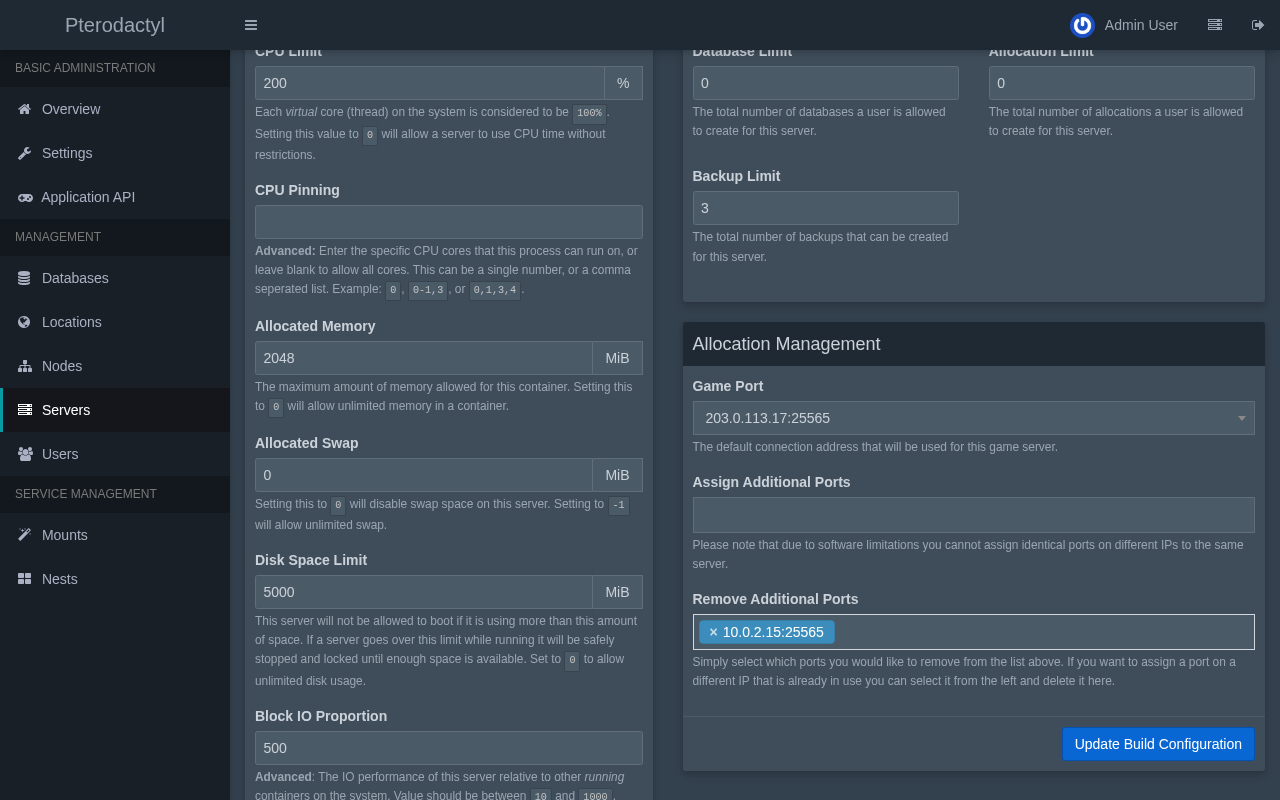
Then choose the new allocation as the Game Port, select the old one under Remove Additional Ports, and save again. The old pair becomes free for another server.
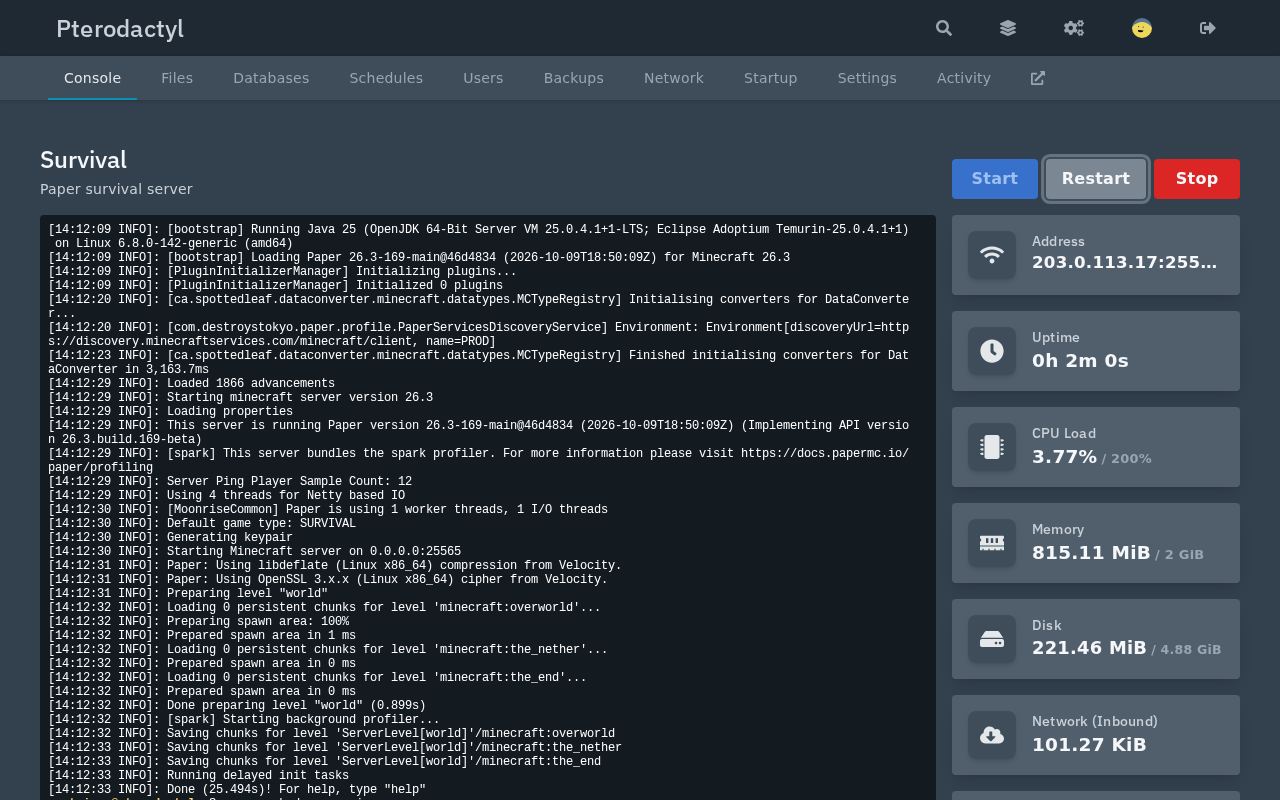
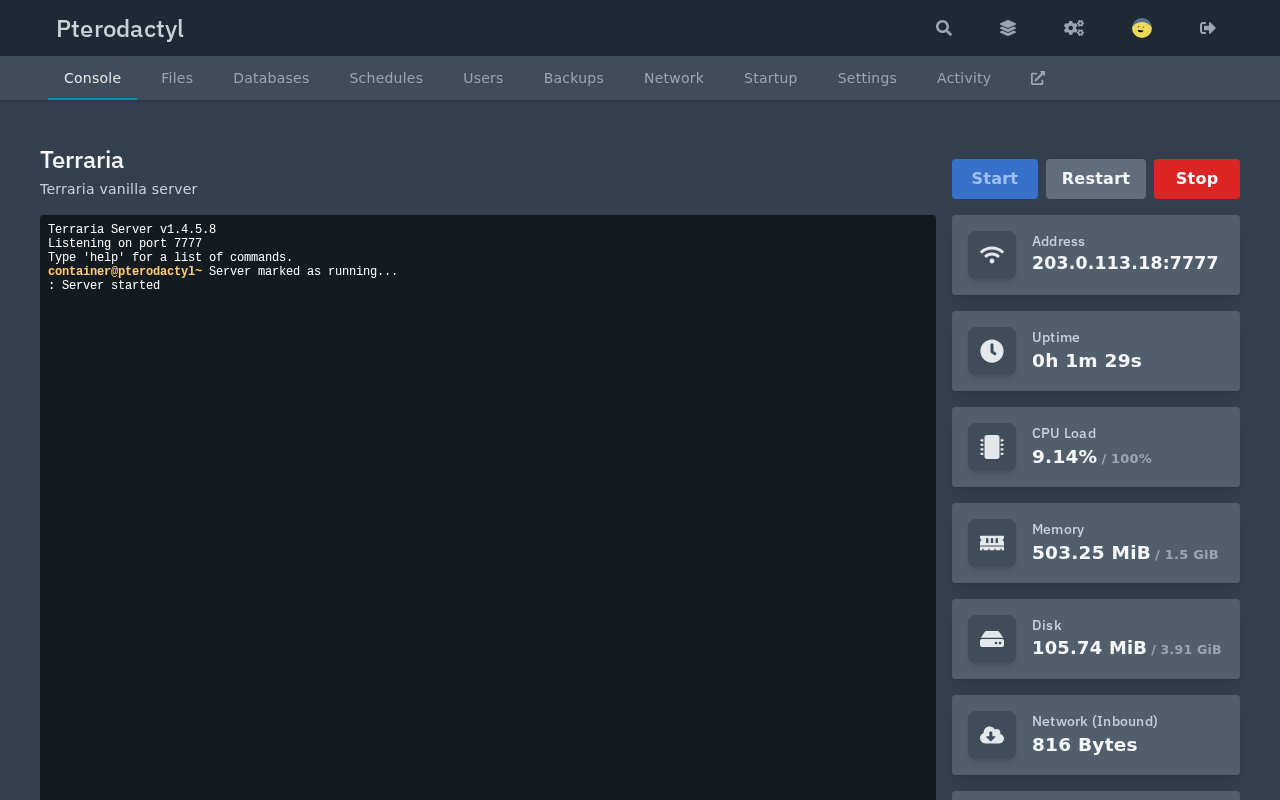
Docker fixes a container's published ports when it creates the container, so the change only takes effect after a restart from the panel. Wings then recreates the container with the new binding, and the console page shows the new address next to the live statistics.
The Terraria server follows the same two saves with 203.0.113.18 and port 7777, and its console shows the same change.
Test from Outside the Tunnel
A check from a computer that is not on the machine's network proves the whole path, since the panel's own status says nothing about the internet. The command nc -vz tries a TCP connection and reports whether the port answers:
nc -vz 203.0.113.17 25565
nc -vz 203.0.113.18 7777
Both should report success. A test from the far end of the tunnel showed the expected pattern of open and closed doors:
- 203.0.113.17 port 25565: open, and a Minecraft server list ping answered with Paper 26.3 and 0 of 20 players.
- 203.0.113.18 port 7777: open, the Terraria server.
- The other game's port on each address: closed, because 7777 is not published on the first address and 25565 is not published on the second.
- SSH, the panel, and Wings on either address: blocked, which is what the firewall lines are for.
Then add the address in a Minecraft client's multiplayer list. A player types the address and nothing else, because 25565 is the default port. Taipan Transit's own documentation covers more cases in How to Host a Minecraft Server at Home Behind CGNAT, and Routed /29, /28, and /27 IPv4 subnets helps when each of many servers needs its own address.
If a server's address in the panel changed but players still cannot connect, check the three pieces in order: wg show wg0 for a recent handshake, ip route get 1.1.1.1 from the routed address for the tunnel route, and docker ps for a container that lists the routed address in its ports. The first piece that fails is the one to fix.
In summary
- A routed address answers for every service on the machine unless a firewall says otherwise, so only the game ports should be reachable through it.
- Containers need connection marks on top of the source-address rules, because their replies are routed before Docker restores the public source address.
- Each address becomes a panel allocation, and a server moves to it in two saves followed by a restart.
- Stopping the tunnel before editing its file avoids a half-removed set of rules.
In the next section, you'll back up the platform, schedule the backups, and decide what to watch.