
In the previous guide, you created this platform's first VM and installed a guest OS on it, namely a Debian system reachable only from inside the Proxmox host's own bridge. To reach it from the internet, you'll first order a routed IPv4 and a tunnel from Taipan, terminate that tunnel on the Proxmox host itself, and then route one of the addresses down to the VM.
Order a Routed IPv4 and a Tunnel
Ordering starts from the panel rather than from Proxmox: picking a tunnel type from the service list opens that product's own configuration screen, the same layout behind GRE, IPsec, and WireGuard alike.
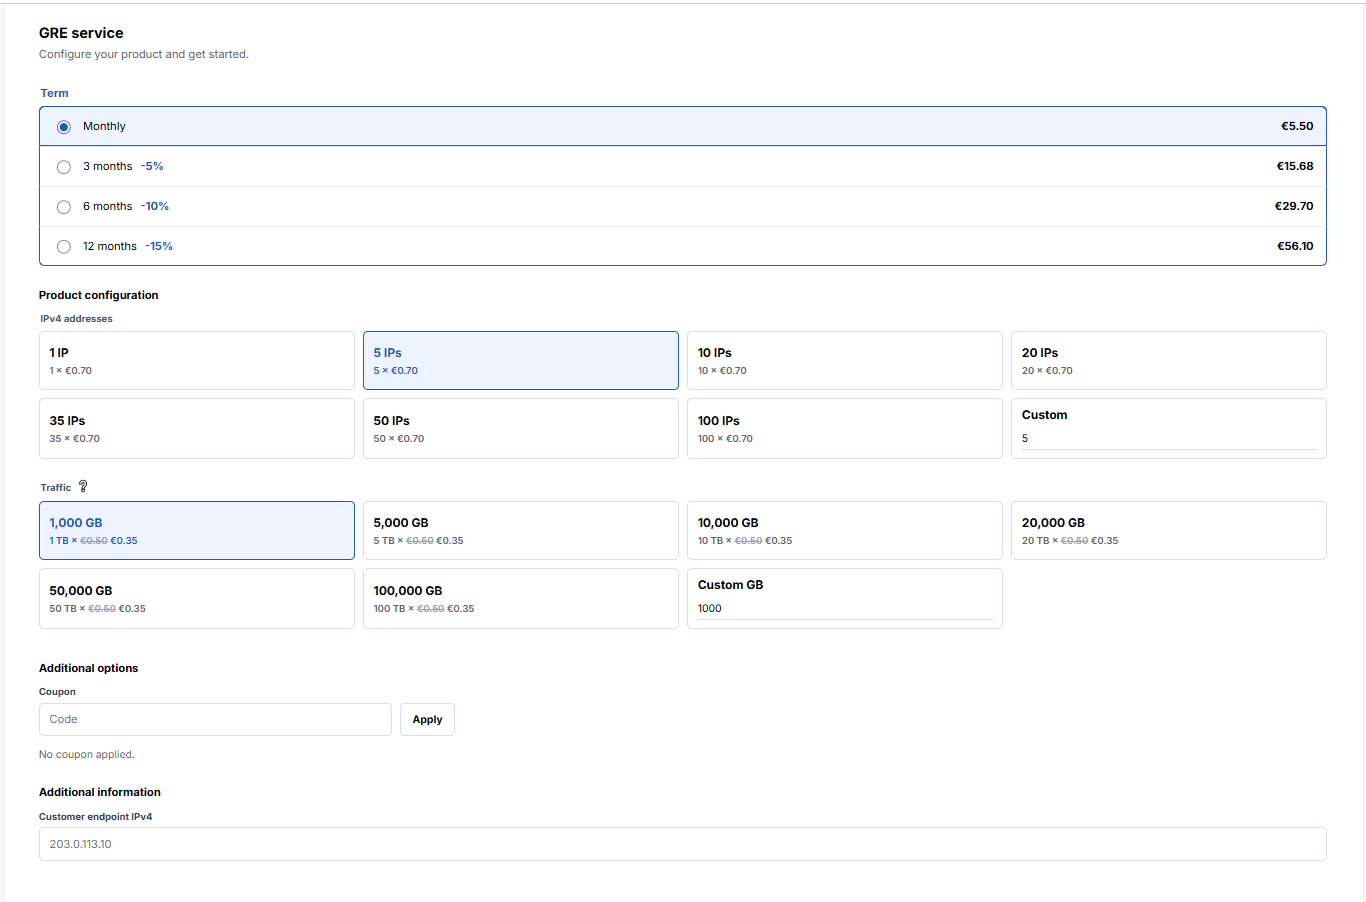
Five IPs, highlighted in that screenshot, is the exact size this guide orders: one for the VM built in the previous section, and four more to distribute once additional VMs exist. Traffic works the same way, a flat tile rather than a running meter, and the crossed-out price next to it is the same campaign discount already visible on the pricing page.
That particular capture is the GRE product's screen, and its last field, Customer endpoint IPv4, is specific to GRE: a fixed source address the tunnel expects traffic from. WireGuard's own version of this same page drops that field entirely, since a WireGuard peer authenticates by key pair rather than by a fixed source address, and everything else on the page, Term, IPv4 count, traffic tier, stays identical.
Three tunnel types sit behind that choice of product, and each one trades off differently:
- GRE: the simplest of the three. No encryption at all, so it's fast, but it will not survive a NAT hop on its own.
- IPsec: authenticated and encrypted through an IKE-negotiated session, the right choice when the traffic itself needs to stay confidential in transit.
- WireGuard: modern keypair-based encryption with a small setup that keeps working through IP changes, the easiest starting point on a connection without a fixed public address.
This Proxmox host sits behind whatever address its own upstream connection happens to hand it, so WireGuard is the tunnel type this guide actually orders: a static key pair survives that address changing, where GRE's fixed endpoint-to-endpoint model would not.
Five addresses cover this guide's needs: one for the VM built in the previous section, and four more to distribute once additional VMs exist. Completing the order returns a real order ID, a block of five routed IPv4 addresses, and the WireGuard endpoint this tunnel terminates against:
order:    NL7R2aRA2oVbjHiL3DLfzXBd
endpoint: 195.123.189.9
routed:   195.123.189.17
          195.123.189.18
          195.123.189.19
          195.123.189.20
          195.123.189.21
If the order confirms but the tunnel itself briefly shows a pending state, that's normal. Provisioning happens on the router handling that endpoint on its own schedule, so give it a short moment before moving on to the next step.
Terminate the Tunnel on the Proxmox Host
Nothing about a WireGuard tunnel is Proxmox-specific: it's a plain Linux interface, configured the same way whether it happens to run on a hypervisor or any other Debian box. That also means every command below is exactly what a provisioning script would run unattended, with no wizard standing between the panel and the interface itself.
Generate a Key Pair
WireGuard authenticates peers with key pairs rather than a shared secret, so the first step happens entirely offline, before Taipan is involved at all:
install -d -m 700 /etc/wireguard
sh -c 'umask 077; wg genkey | tee /etc/wireguard/taipan.key | wg pubkey > /etc/wireguard/taipan.pub'
cat /etc/wireguard/taipan.pub
That last command prints the public half, the only part that actually needs to leave this host:
FIv6nJ3IE0EsMH79Hxj6wV4piku0Guj8nvyaUJ7PEic=The private key in /etc/wireguard/taipan.key never gets pasted anywhere, submitted, or emailed: only the public key travels to Taipan, the same asymmetry that makes an SSH key pair safe to generate before an account even exists to use it with.
Write the WireGuard Configuration
With the routed addresses and the endpoint from the order, and Taipan's own public key and UDP port from the panel, /etc/wireguard/wg0.conf holds everything the interface needs:
[Interface]
PrivateKey = <contents of /etc/wireguard/taipan.key>
Address = 100.64.0.2/32
Table = off
PostUp = ip rule add from 195.123.189.17/32 table 20 priority 100
PostUp = ip rule add from 195.123.189.18/32 table 20 priority 100
PostUp = ip rule add from 195.123.189.19/32 table 20 priority 100
PostUp = ip rule add from 195.123.189.20/32 table 20 priority 100
PostUp = ip rule add from 195.123.189.21/32 table 20 priority 100
PostUp = ip route add default dev %i table 20
PreDown = ip rule del from 195.123.189.17/32 table 20 priority 100
PreDown = ip rule del from 195.123.189.18/32 table 20 priority 100
PreDown = ip rule del from 195.123.189.19/32 table 20 priority 100
PreDown = ip rule del from 195.123.189.20/32 table 20 priority 100
PreDown = ip rule del from 195.123.189.21/32 table 20 priority 100

[Peer]
PublicKey = <Taipan's public key, from the panel>
Endpoint = 195.123.189.9:51820
AllowedIPs = 0.0.0.0/0
PersistentKeepalive = 25
Table = off stops wg-quick from touching this host's own default route, which still needs to leave through the normal uplink for everything that isn't one of these five addresses. The PostUp lines build a second routing table instead, one that only traffic sourced from a routed address ever consults, so a reply from 195.123.189.17 leaves through the tunnel while ordinary outbound traffic from the host is entirely unaffected.
Why does the Address field use 100.64.0.2 instead of one of the five real addresses?
Because the tunnel interface itself doesn't need a public identity, only the routed addresses riding on top of it do. 100.64.0.0/10 is the shared address space set aside for exactly this kind of unnumbered point-to-point link, so it numbers the interface without spending one of the five addresses this guide actually pays for.
Bring the Tunnel Up
wg-quick reads that same file and does, in order, exactly what its own output lists: creates the interface, loads the key, assigns the address, and runs every PostUp line.
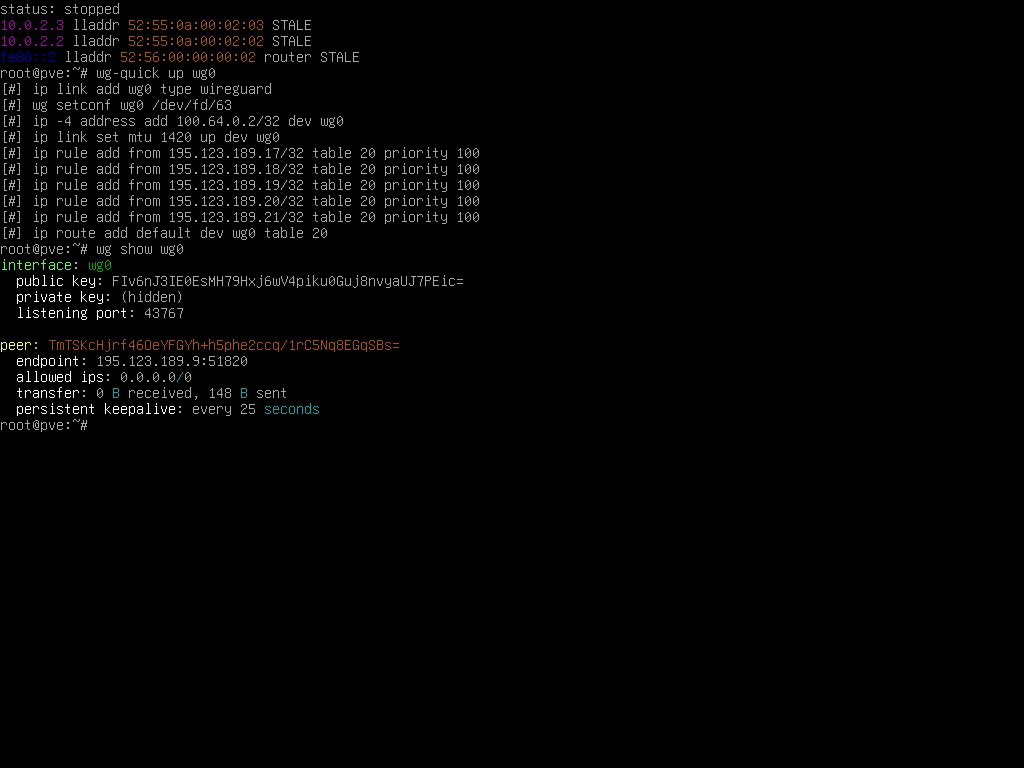
A fresh interface shows 0 bytes received until the peer actually answers, which can take a moment after the very first packet. A handshake only proves the encrypted peer relationship itself is working, so whether a routed address is actually reachable end to end is worth testing deliberately, rather than assumed from a clean wg show alone.
Route an Address to the VM
The tunnel now lands on the Proxmox host itself, so one more hop is needed to actually reach the VM: a route that hands a specific address to that VM's own private address on vmbr0, the same bridge configured two guides ago.
ip route add 195.123.189.17/32 via 10.0.2.100 dev vmbr0That single line is the entire difference between serving a routed address from the gateway itself and delivering it to a VM sitting behind it: instead of adding the address to lo on the host, as a service running directly on the gateway would, the host forwards it one hop further to whatever internal address the VM already holds.
The VM's own side needs two matching pieces: the public address itself, and a route back out through the host for anything sourced from it.
ip address add 195.123.189.17/32 dev ens18
ip route add default via 10.0.2.100 dev ens18 onlink
Before testing from outside: make sure net.ipv4.ip_forward = 1 is actually set on the Proxmox host itself. Forwarding between the tunnel and vmbr0 depends on it, and a routed address silently goes nowhere without it. To check, sysctl net.ipv4.ip_forward should print a 1.
With forwarding on and both sides configured, ip route get 1.1.1.1 from 195.123.189.17 run on the Proxmox host confirms the path actually chosen for that address: a result showing dev wg0 means replies leave through the tunnel as intended, while anything else means the source-specific routing from the previous step needs a second look before testing any further.
Distribute the Remaining Addresses
Four addresses from this same order are still unused, and the pattern that delivered the first one repeats exactly for each of them: a private address on vmbr0 for the VM in question, a host-side route pointing at it, and the address itself added on that VM's own interface.
195.123.189.17  ->  web01, 10.0.2.100 (this guide)
195.123.189.18  ->  next VM, once created
195.123.189.19  ->  next VM, once created
195.123.189.20  ->  next VM, once created
195.123.189.21  ->  next VM, once created
All five still share the one tunnel and the one routing table set up earlier: table 20 already carries a source-specific rule for every address in the block, so a new VM only ever needs its own ip route add <address>/32 via <its internal IP> dev vmbr0 on the host side, nothing further on the tunnel itself.
In summary
- A WireGuard tunnel is a plain Linux interface, configured with the same commands whether or not Proxmox is involved.
Table = offplus source-specific routing keeps a routed address separate from the host's own default route.- Delivering an address to a VM instead of the gateway itself only adds one more route, pointed at that VM's internal address.
- Every address in the same order rides the one tunnel, each needing only its own route once a VM exists to receive it.
In the next guide, you'll template this VM to bring the next one up in a fraction of the time.