
In the previous guide, you hardened this single Proxmox node, namely a non-root account with two-factor authentication, a firewall, and an API token scoped for automation. This guide uses all three to build the first VM the platform will actually host, from fetching an installer image through to a running guest with an operating system on it.
Fetch an Installer Image
A fresh Proxmox install ships with no installer media at all, so before any VM can point at an operating system, that operating system's installer has to exist somewhere Proxmox can reach. The ISO Images panel under a storage's own page is where that media lives, and it starts out completely empty.
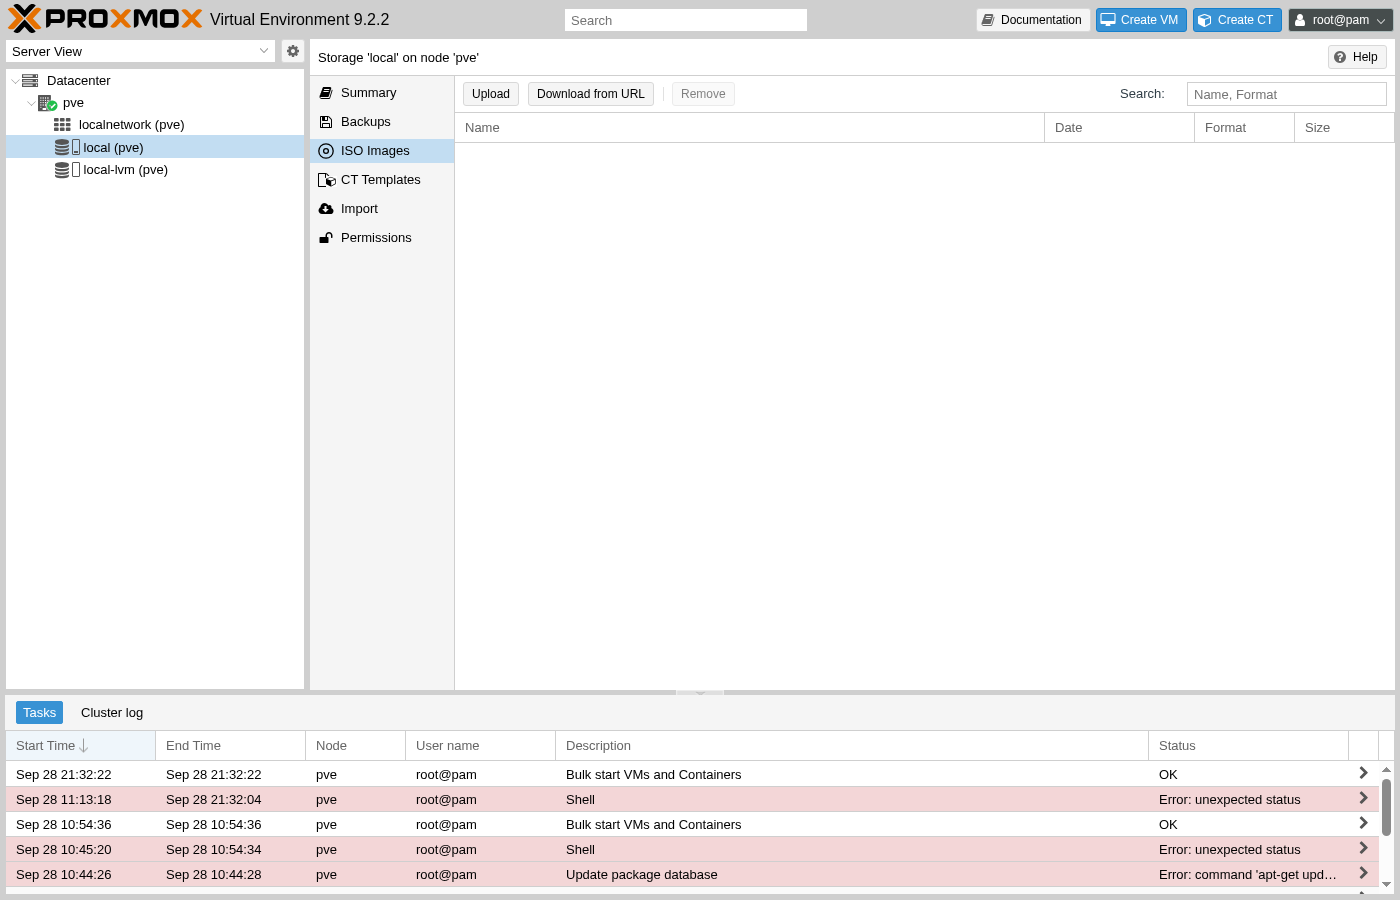
Proxmox can fetch that media itself, directly on the node, instead of uploading a file from a local machine over a slow connection. The Download from URL button on the same panel opens a small dialog that asks for nothing more than a URL.
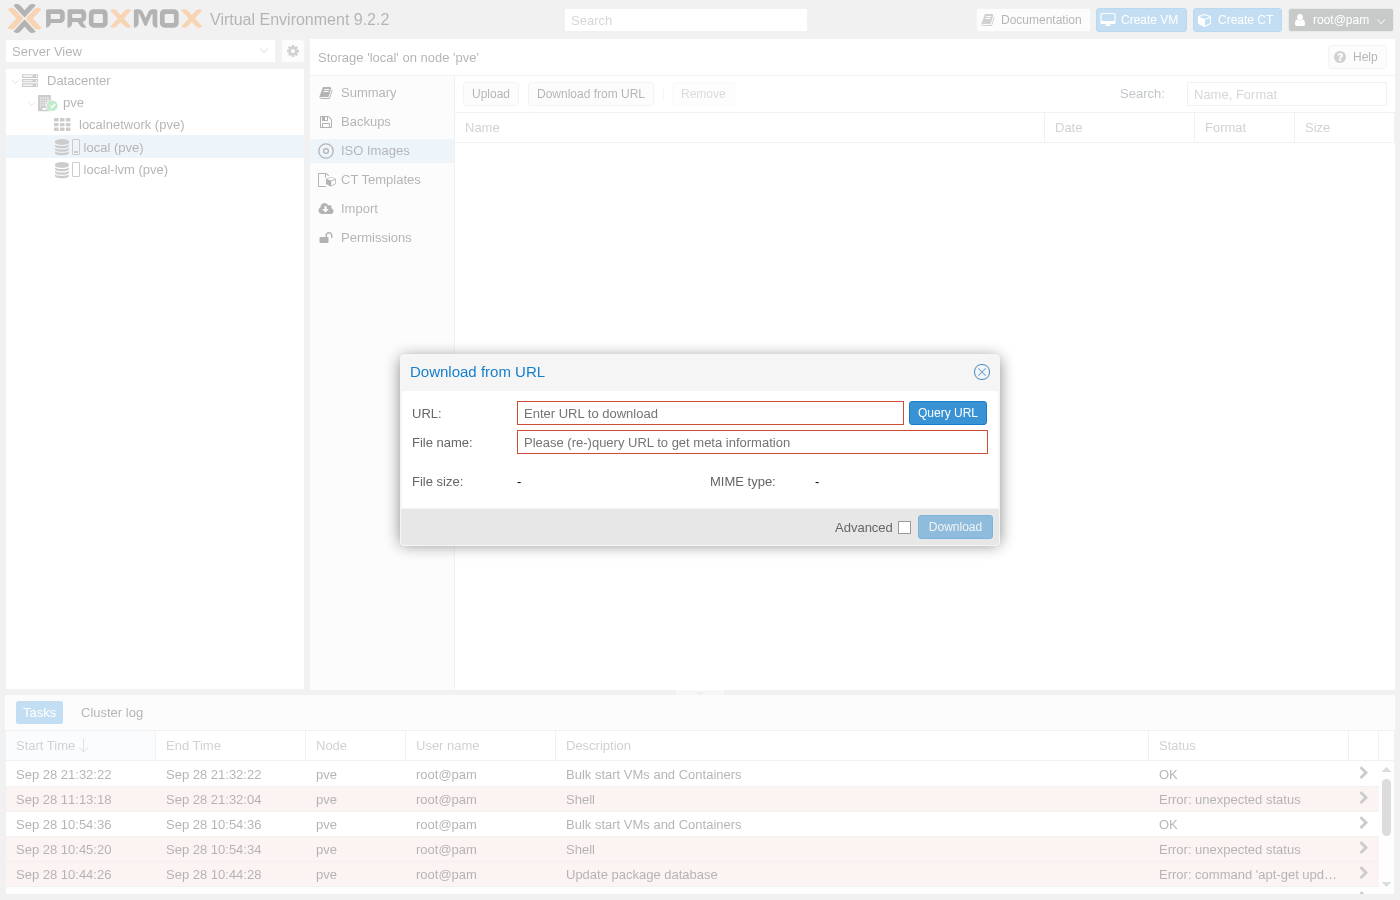
This guide installs Debian inside the VM, the same distribution Proxmox itself runs on, using the small netinst image rather than a full DVD: a few hundred megabytes that pull in the rest of the packages the install actually needs over the network as it runs.
Why not just clone the Proxmox host's own operating system into the VM instead?
Because a hypervisor's own OS and whatever runs inside its VMs are separate concerns entirely. Proxmox's own Debian base exists only to run the hypervisor stack, while a guest VM is free to run whatever a given workload actually needs, and across a real platform that's rarely the same distribution twice.
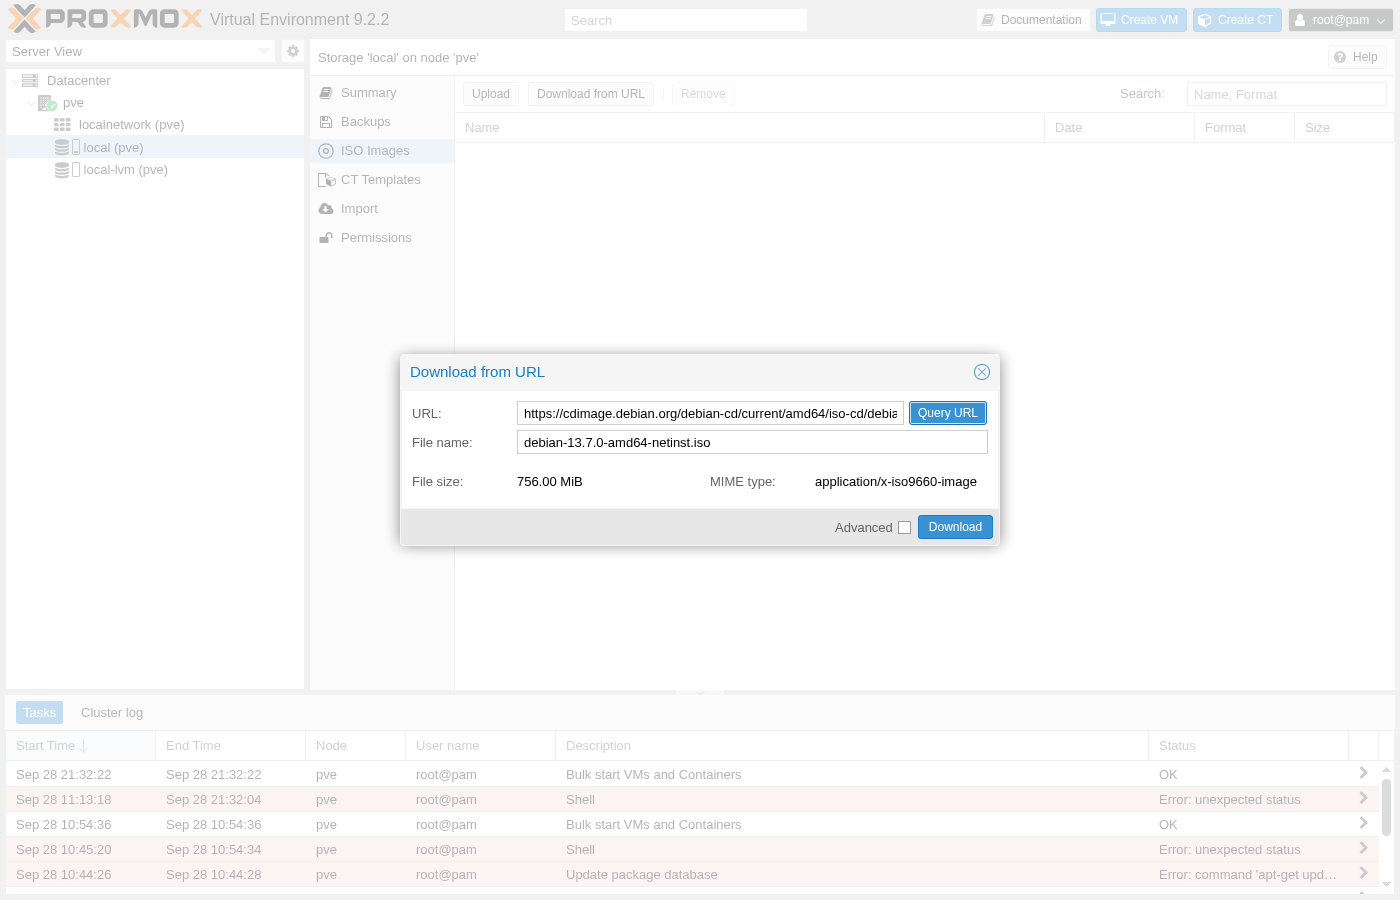
Pasting in the real Debian netinst URL and clicking Query URL resolves the file before anything downloads, confirming both a real size and a real content type.
Clicking Download runs the fetch on the node itself, in the background, with its own real-time task log rather than a browser progress bar tied to this one tab.
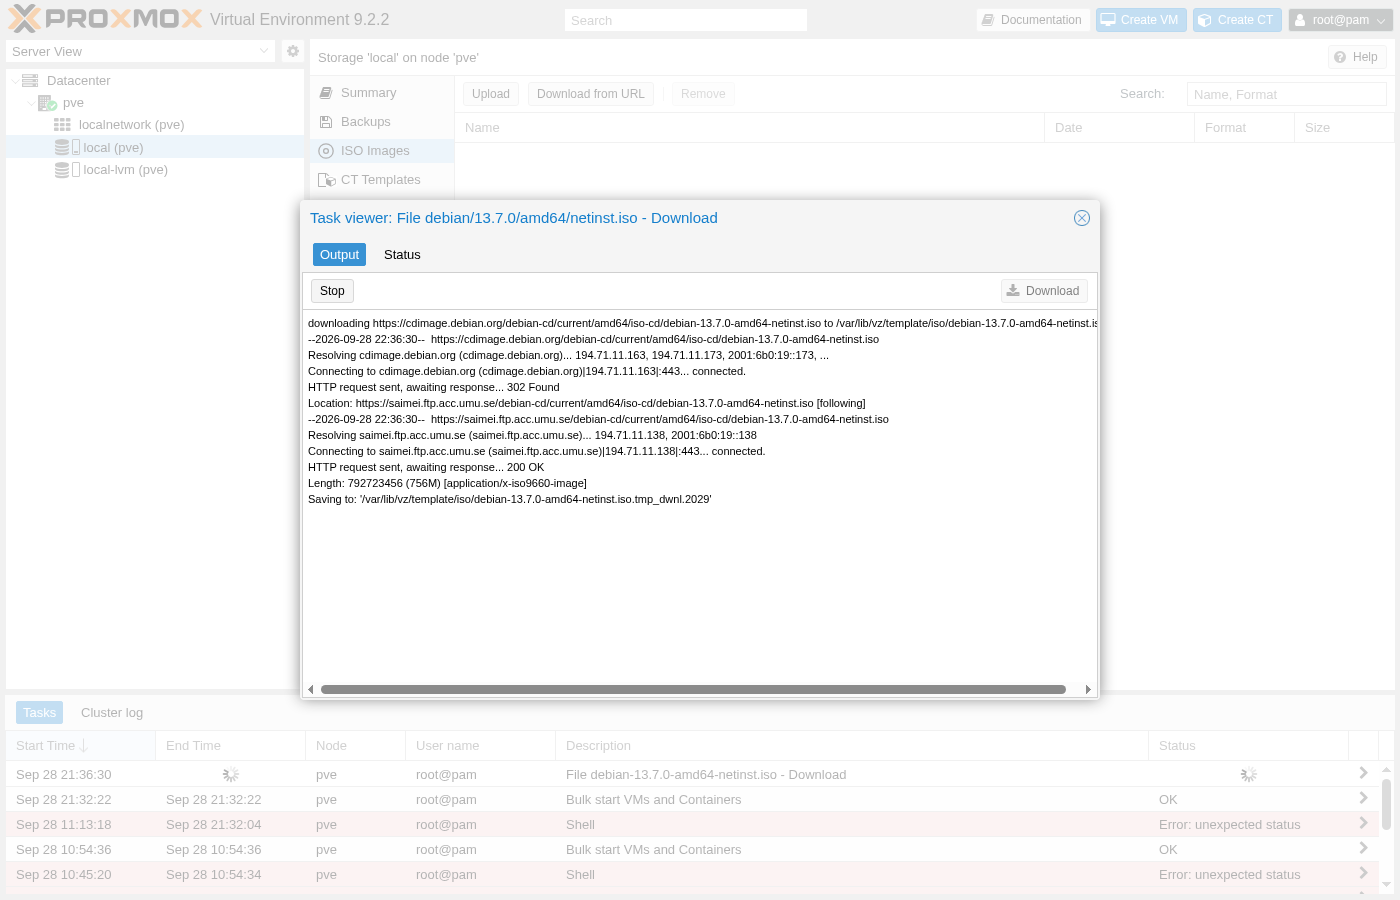
That redirect is worth noticing rather than skipping past: cdimage.debian.org itself never serves the file, it only decides, request by request, which real mirror is closest or least loaded and bounces the download there. A different attempt, from a different network, can land on a completely different mirror without anything on the Proxmox side changing.
Once the task finishes, the same ISO Images list from before now shows exactly one file, with a real size and a real timestamp instead of a placeholder.
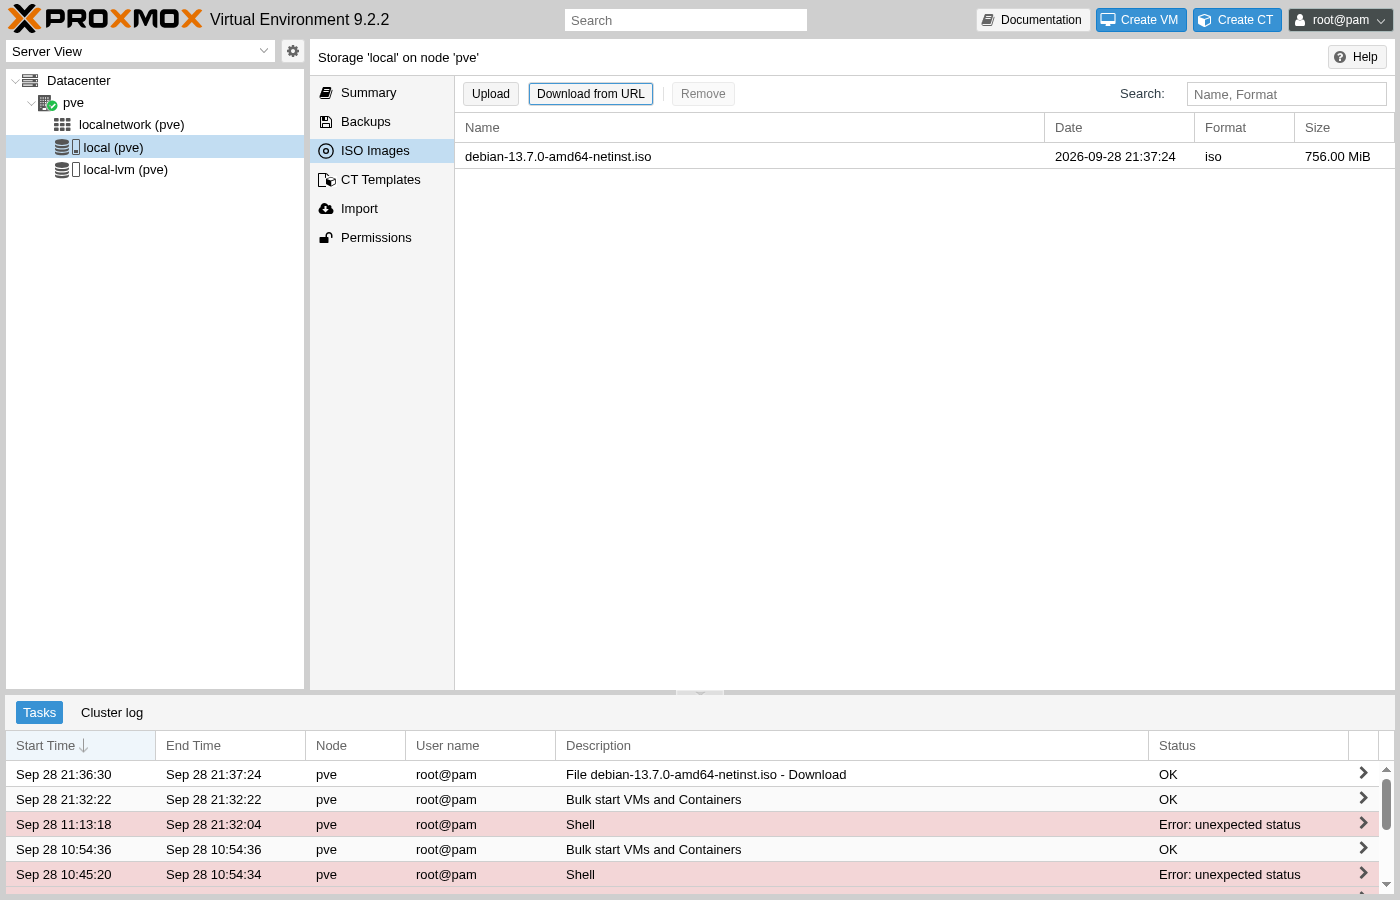
The Download from URL button is itself a thin wrapper around one API call, worth knowing about directly once this step needs to run unattended as part of provisioning a whole platform instead of a person clicking through a dialog each time:
curl -k -X POST "https://pve.example.com:8006/api2/json/nodes/pve/storage/local/download-url" \
  -H "Authorization: PVEAPIToken=opsadmin@pve!automation=<token-secret>" \
  --data-urlencode "content=iso" \
  --data-urlencode "filename=debian-13.7.0-amd64-netinst.iso" \
  --data-urlencode "url=https://cdimage.debian.org/debian-cd/current/amd64/iso-cd/debian-13.7.0-amd64-netinst.iso"
The token here is the same opsadmin@pve!automation token created in the previous guide, still scoped to only the permissions it actually needs.
Walk Through the Create VM Wizard
Create VM, in the top right corner of any Proxmox page, opens an eight-tab wizard. Nothing about it is hidden magic: every field across all eight tabs collects into a single set of parameters, submitted once, right at the end, as one API call. Watching each tab shape that same call, piece by piece, makes the API itself far less mysterious once it shows up on the last tab.
Name the VM and Pick a VM ID
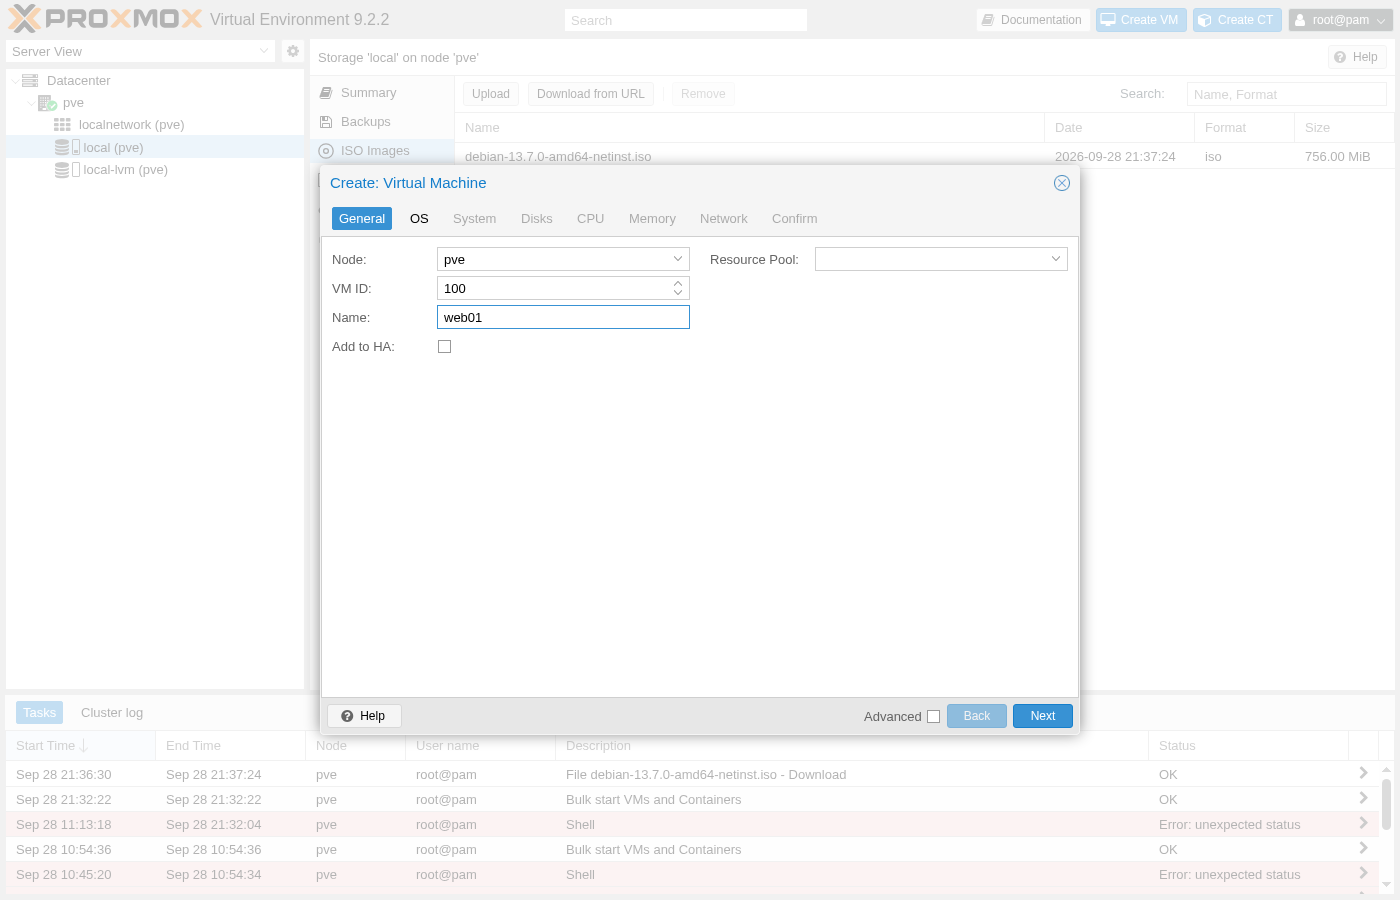
The General tab asks for the least interesting details first: a VM ID, which Proxmox already fills in with the next free number on this node, and a Name, which stays purely cosmetic and never touches the actual guest OS unless it's copied in by hand later.
Point It at the Installer Image
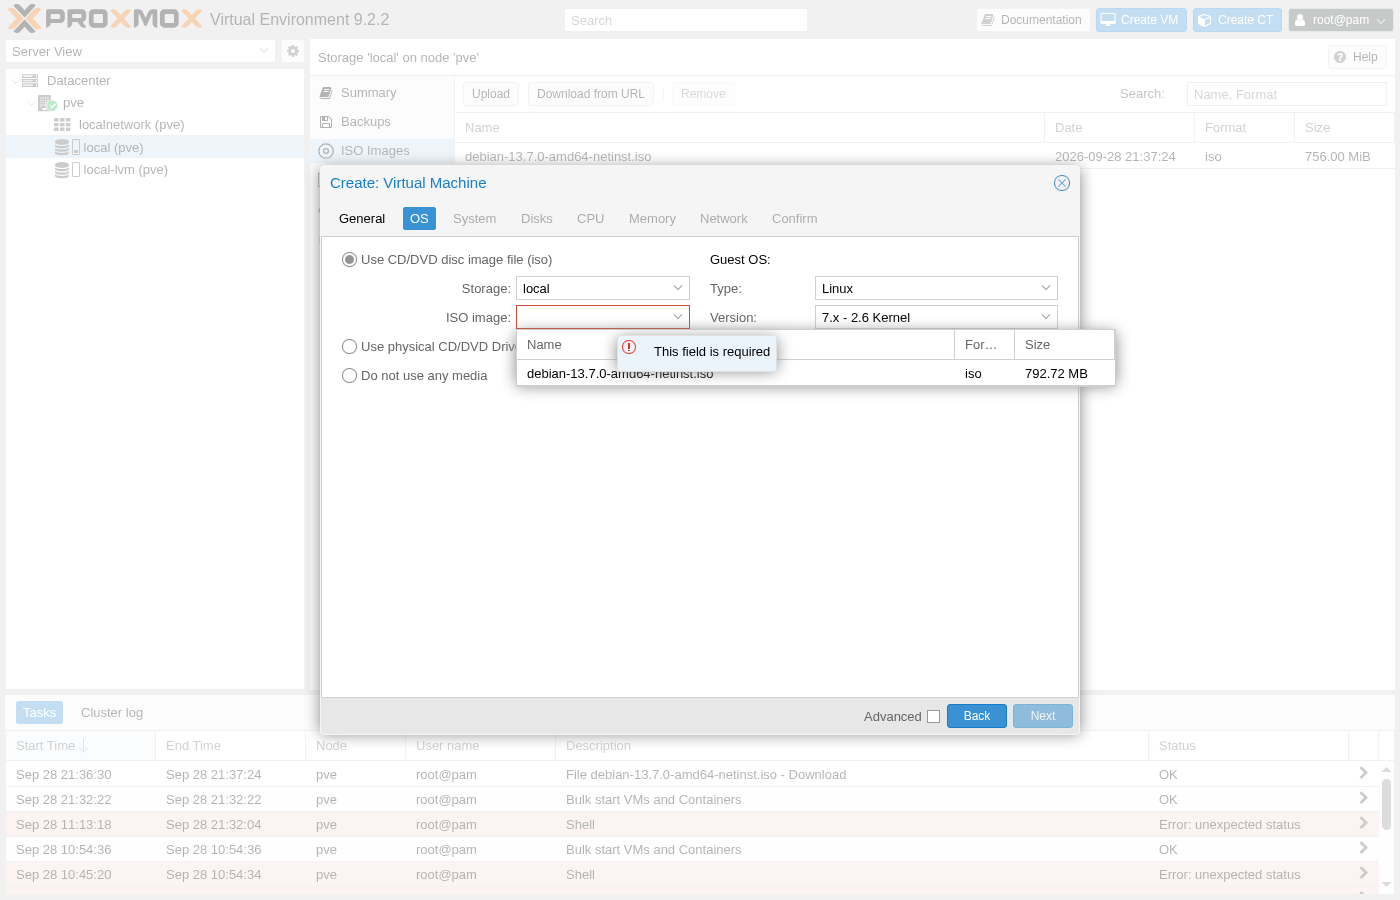
The OS tab is where the ISO fetched earlier actually gets used. Leaving the ISO image field untouched and trying to move on surfaces a real validation error rather than letting the wizard proceed silently.
Selecting that file also sets Guest OS Type to Linux, and Version to a dropdown that's smaller than it looks: Proxmox only actually distinguishes two Linux generations here.
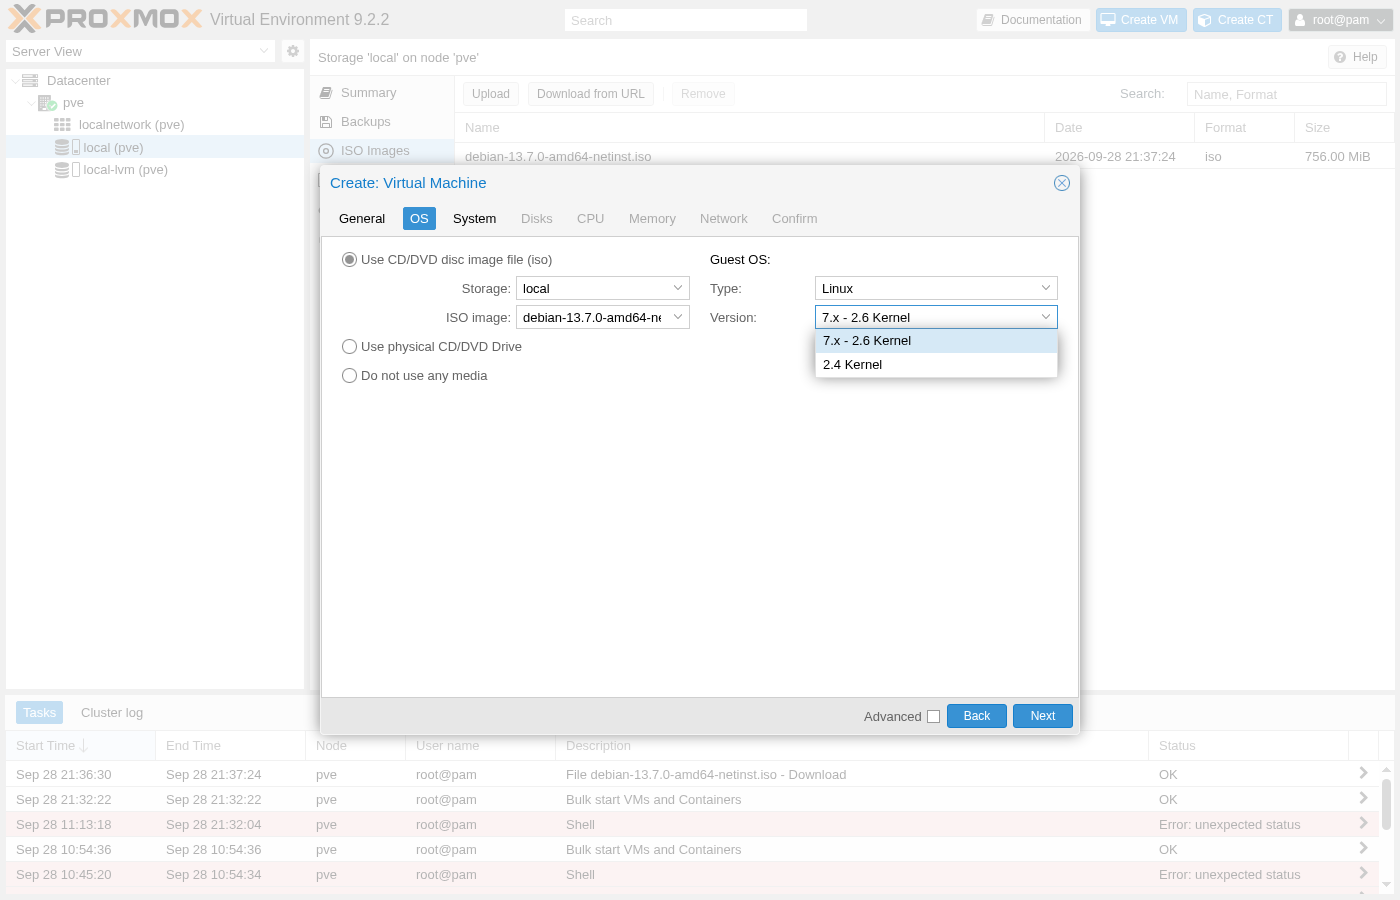
So does the exact number in "7.x" actually matter for a Debian 13 guest?
Not in any way that changes behavior. "7.x - 2.6 Kernel" is Proxmox's own shorthand for any modern Linux kernel from the 2.6 series onward, which by now covers essentially every distribution still receiving updates; "2.4 Kernel" exists purely for genuinely ancient guests that predate it. Debian 13 falls squarely in the first bucket regardless of the literal "7" in the label.
Leave the System Defaults, Check One Box
The System tab's defaults are already sensible for a first VM: VirtIO SCSI single as the disk controller, Default (i440fx) as the machine type, SeaBIOS rather than UEFI. The one box worth checking deliberately is Qemu Agent, left unchecked by default.
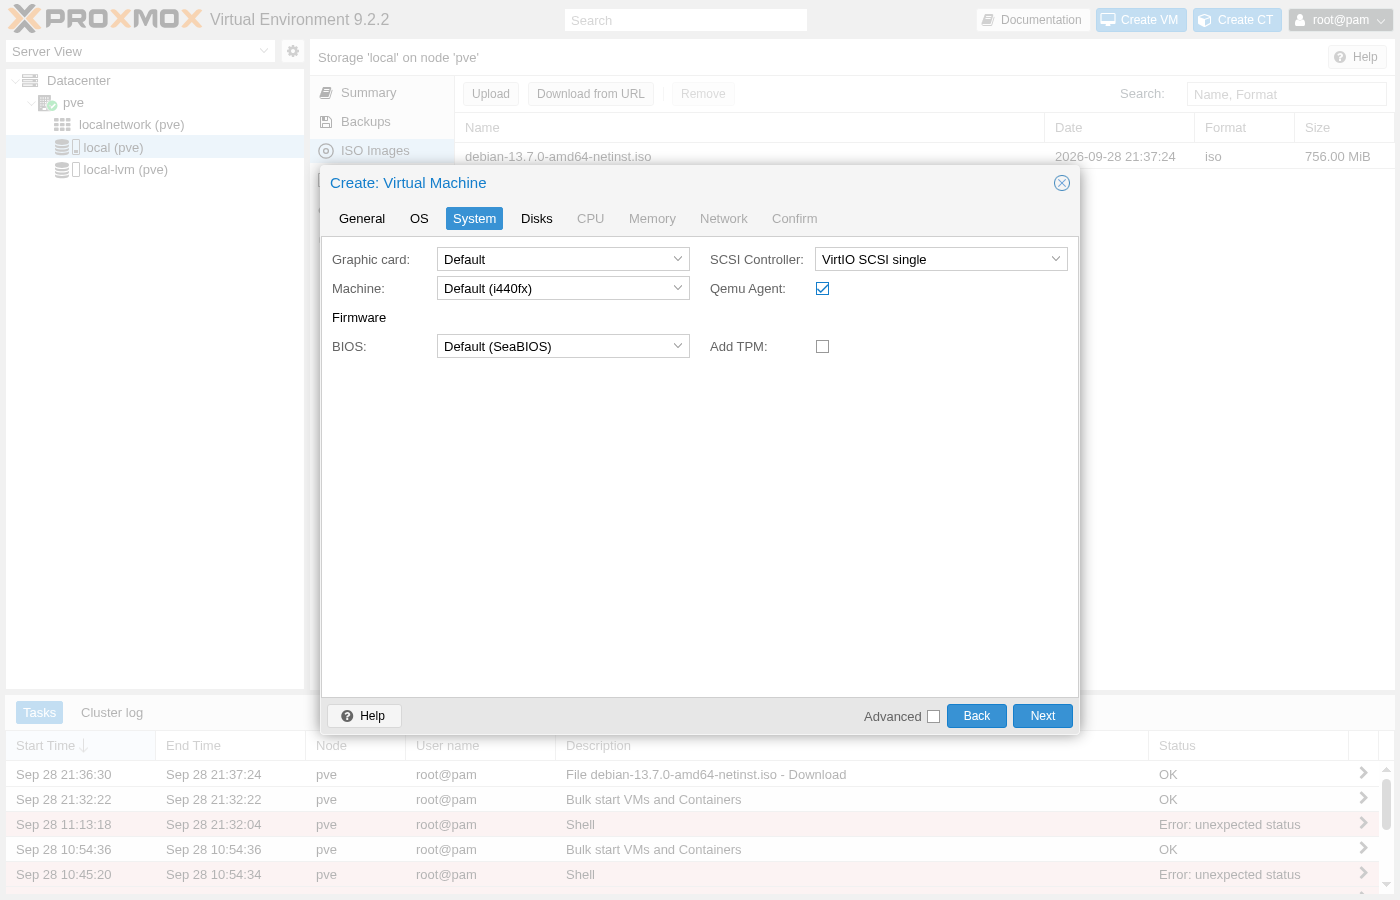
Checking this box doesn't install anything by itself, it only tells Proxmox to expect a guest agent talking back over a virtual serial channel. Whether that agent is actually running inside the guest is a separate question this guide comes back to once the OS itself is installed.
Size the Virtual Disk
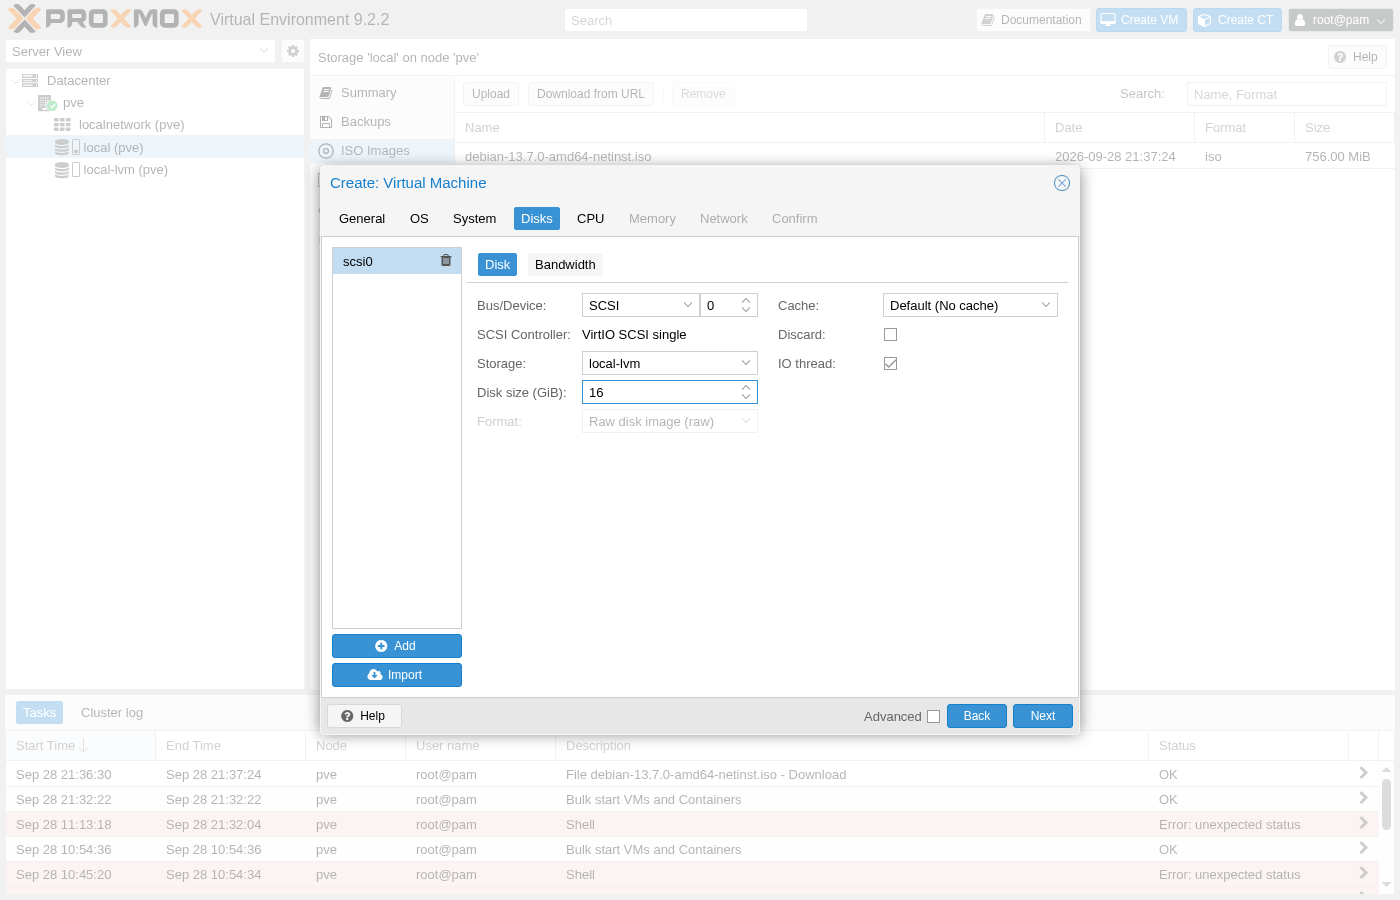
The Disks tab defaults to a 32 GiB disk on local-lvm, more than this first VM needs and more than the thin pool sized in the previous guide should have to carry alone. Trimming it to 16 GiB leaves plenty of room for a base Debian install and its logs without committing more of that pool than a first test VM justifies.
Assign CPU Cores
The CPU tab defaults to a single socket, a single core, and a CPU type of "x86-64-v2-AES" rather than the host's exact model. Bumping cores to 2 gives this VM enough to actually do concurrent work.
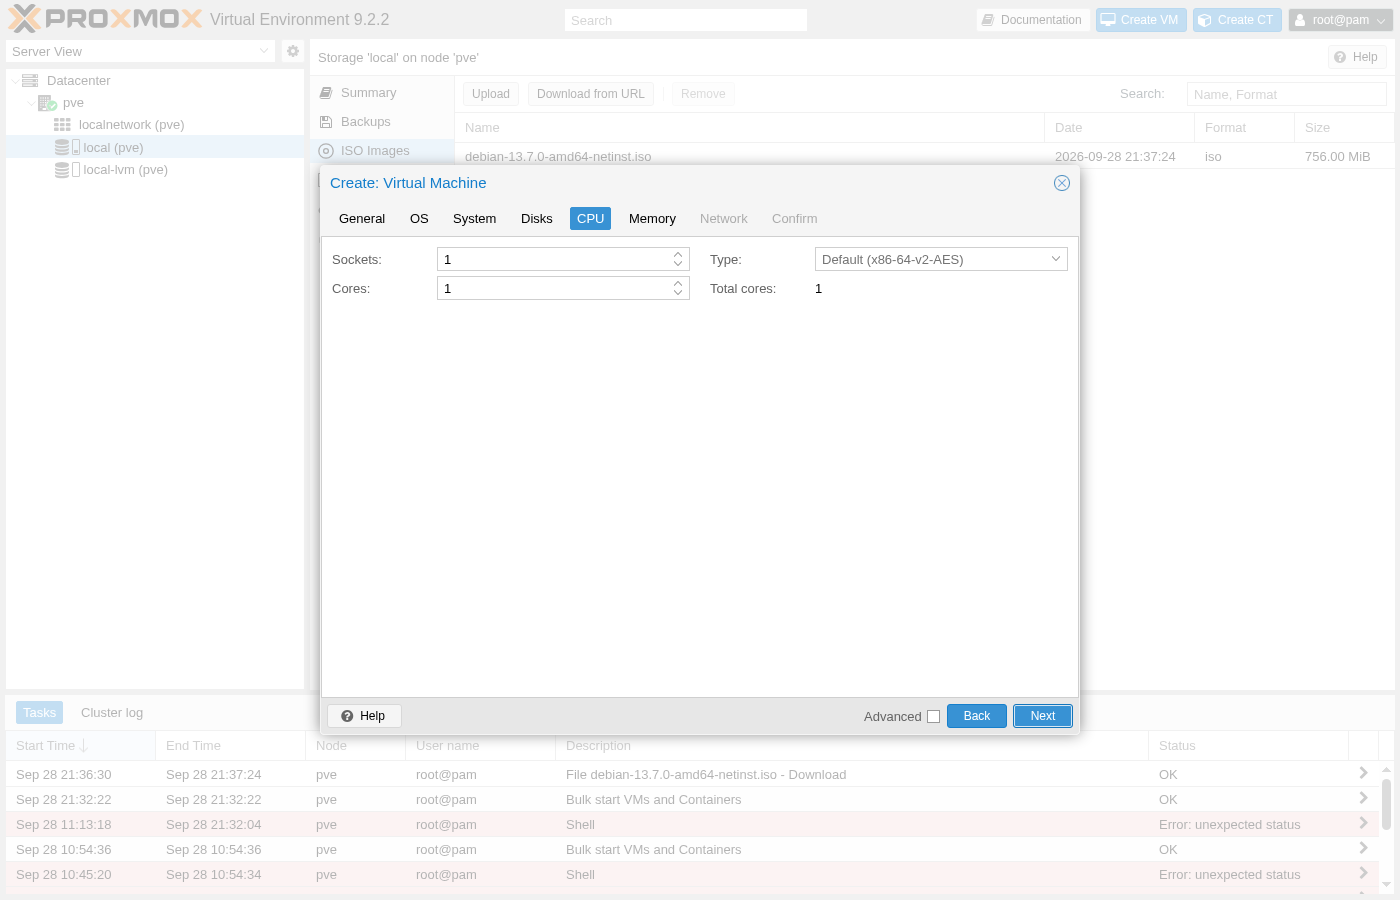
That default is a deliberate contrast with the earlier guide's choice of -cpu host for running Proxmox itself in a lab: a guest VM on a real platform may need to migrate to different physical hardware someday, and a CPU type tied to this one host's exact feature set would make that migration fail outright. A portable baseline type trades a small amount of raw performance for staying movable, which is usually the right trade for anything actually serving customers.
Set the Memory Ceiling
The Memory tab defaults to 2048 MiB. Switching on Advanced reveals the same Ballooning Device and Allow KSM options discussed in the previous guide, both checked by default on any new VM.
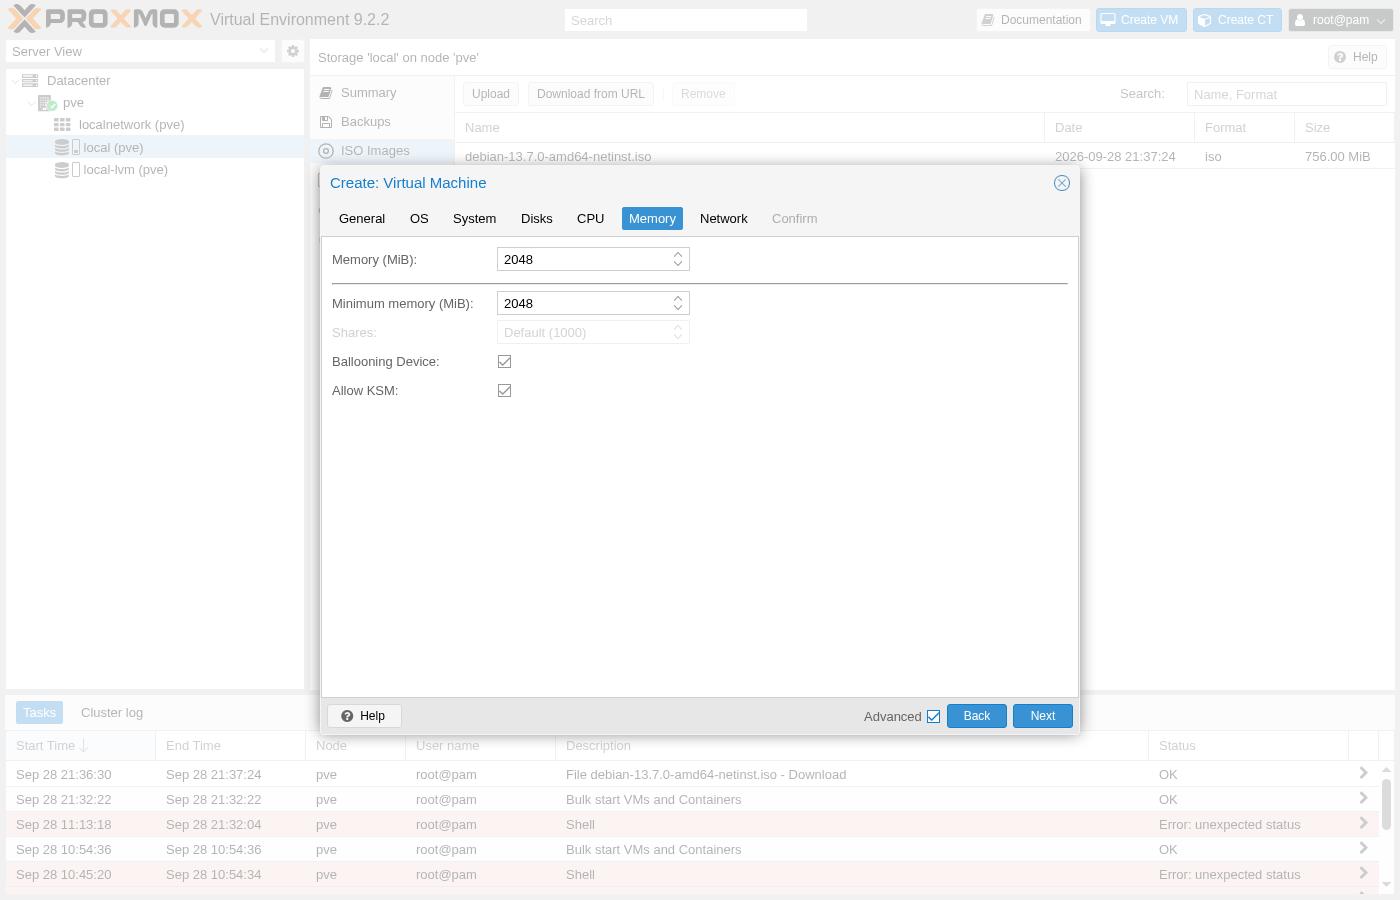
Minimum memory starts equal to Memory itself, which means no actual ballooning range exists yet; it only becomes useful once that minimum is lowered, letting Proxmox reclaim the difference from an idle VM under real memory pressure.
Attach It to the Bridge
The Network tab attaches the VM to vmbr0, the same bridge reviewed in the previous guide, using the VirtIO model for the best performance a paravirtualized driver can offer. Firewall comes checked by default on the network interface itself.
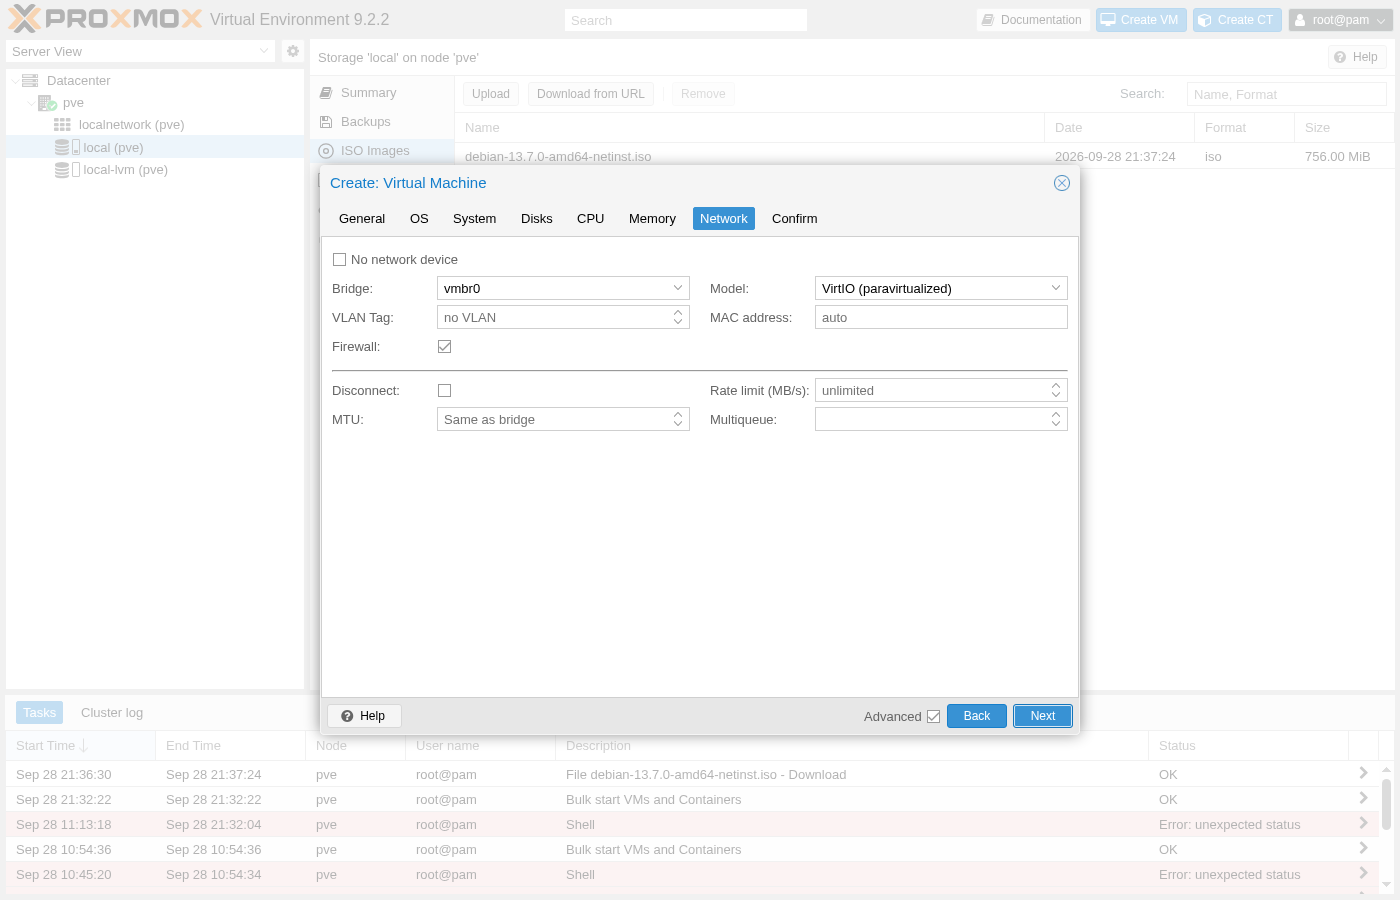
This checkbox is a different switch from the datacenter-level firewall enable reviewed earlier, which is still off on this node. Checking it here has no visible effect yet, but it means the moment that master switch does get turned on later, this VM's traffic is already covered by whatever rules apply to it, rather than needing to be revisited one interface at a time.
Review and Create
The Confirm tab lays out every value from every earlier tab as a flat key and value table, and that table is not a summary written for humans, it's the literal request body the wizard is about to submit.
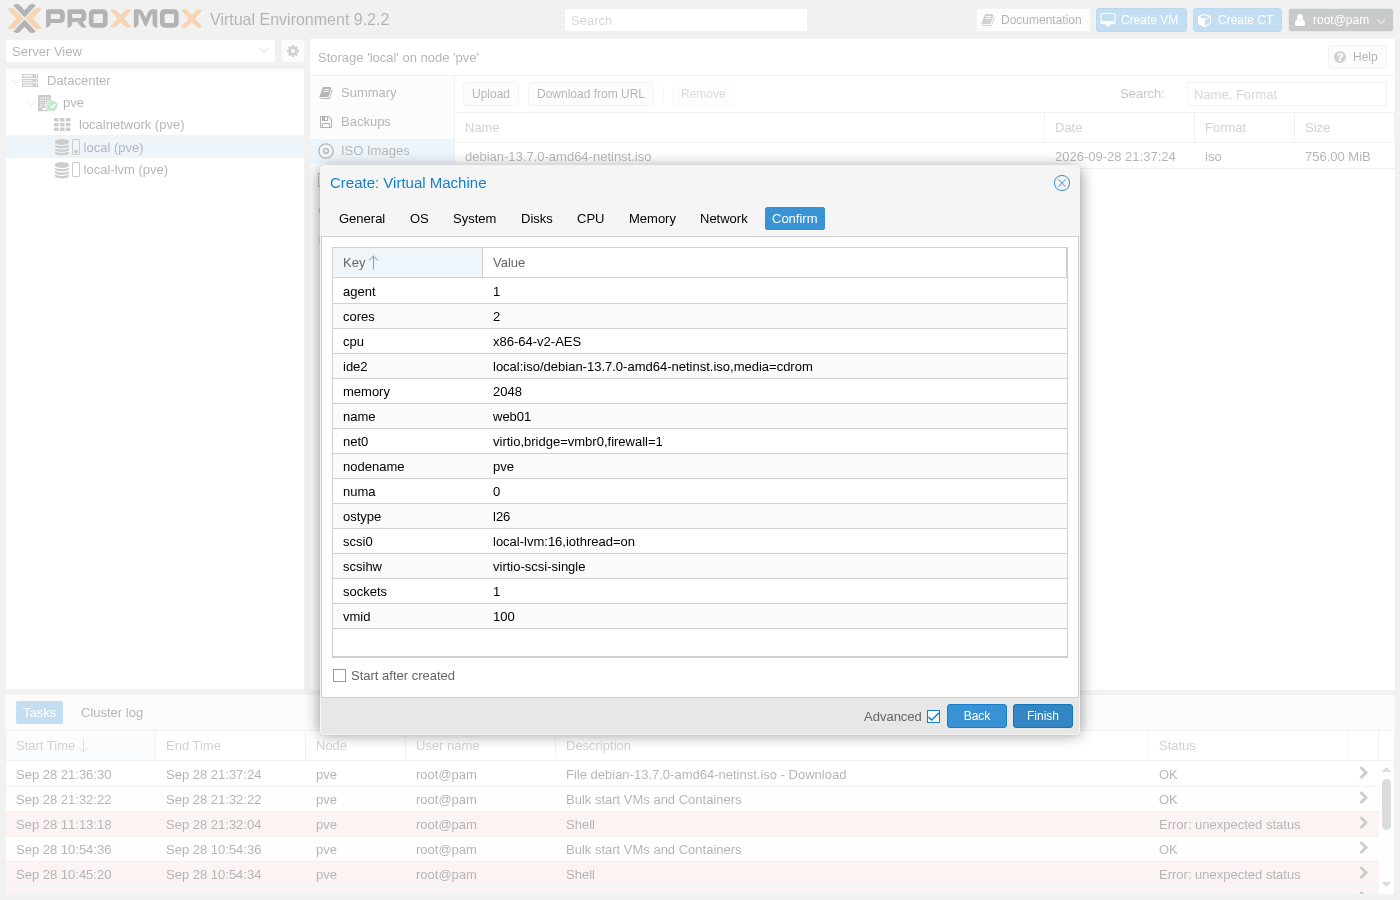
Checking Start after created and clicking Finish sends exactly that table as a single real API request, captured here in full rather than guessed at:
curl -k -X POST "https://pve.example.com:8006/api2/json/nodes/pve/qemu" \
  -H "Authorization: PVEAPIToken=opsadmin@pve!automation=<token-secret>" \
  --data-urlencode "vmid=100" \
  --data-urlencode "name=web01" \
  --data-urlencode "ostype=l26" \
  --data-urlencode "ide2=local:iso/debian-13.7.0-amd64-netinst.iso,media=cdrom" \
  --data-urlencode "scsihw=virtio-scsi-single" \
  --data-urlencode "scsi0=local-lvm:16,iothread=on" \
  --data-urlencode "agent=1" \
  --data-urlencode "sockets=1" \
  --data-urlencode "cores=2" \
  --data-urlencode "cpu=x86-64-v2-AES" \
  --data-urlencode "memory=2048" \
  --data-urlencode "net0=virtio,bridge=vmbr0,firewall=1" \
  --data-urlencode "start=1"
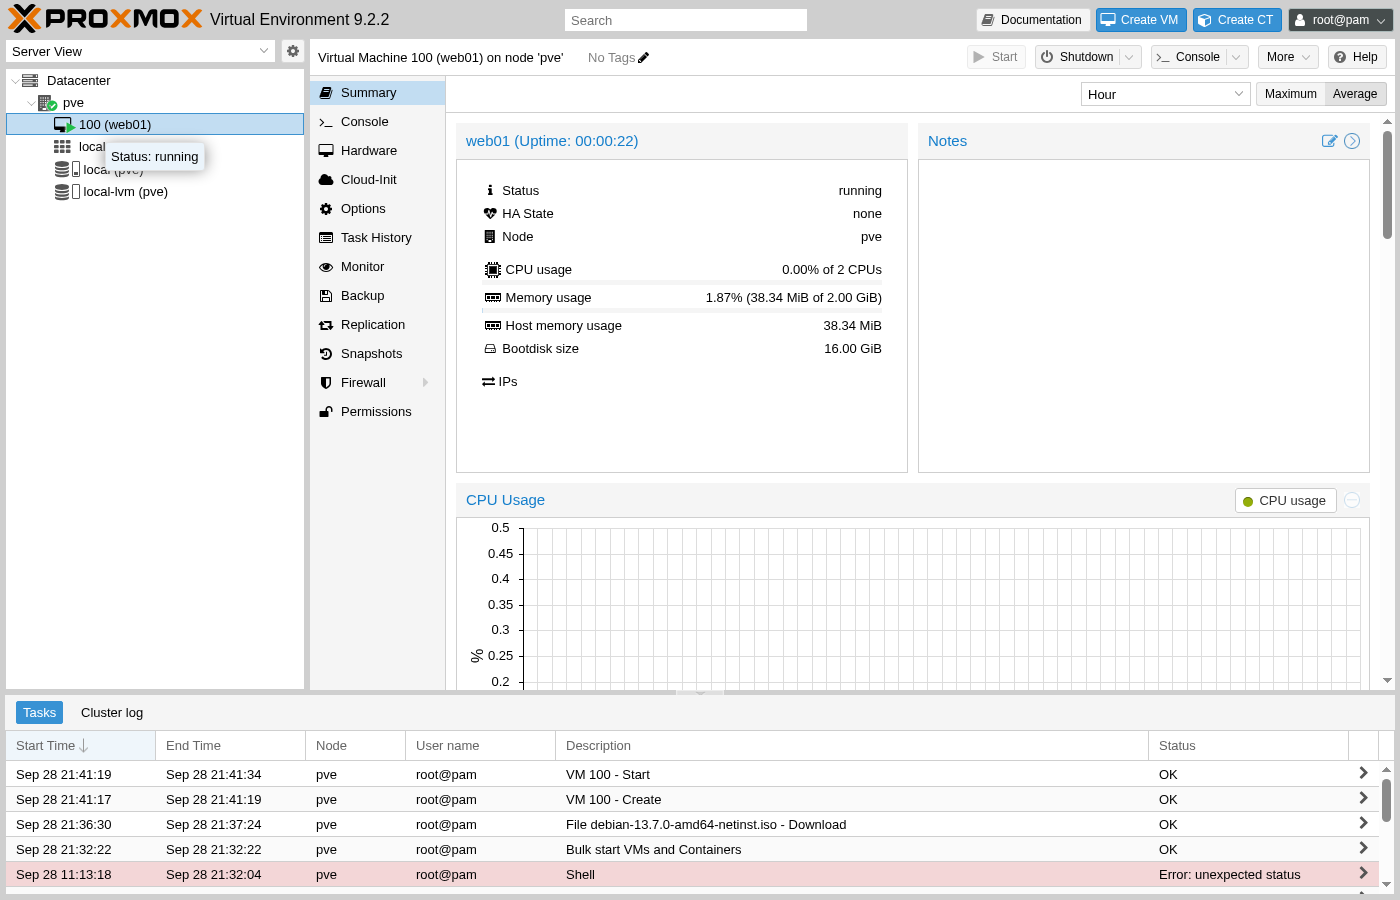
That single call both creates and starts the VM, confirmed by two separate real tasks in the log rather than one: "VM 100 - Create", immediately followed by "VM 100 - Start".
Boot Into the Installer
Opening this VM's Console tab drops straight into the same Debian installer boot menu the previous guide already walked through in detail on the physical host, except this time it's running inside a VM's console instead of on bare metal. The screens ahead are identical either way, so this guide moves through them faster the second time around, calling out only what's genuinely new or different for a guest install.
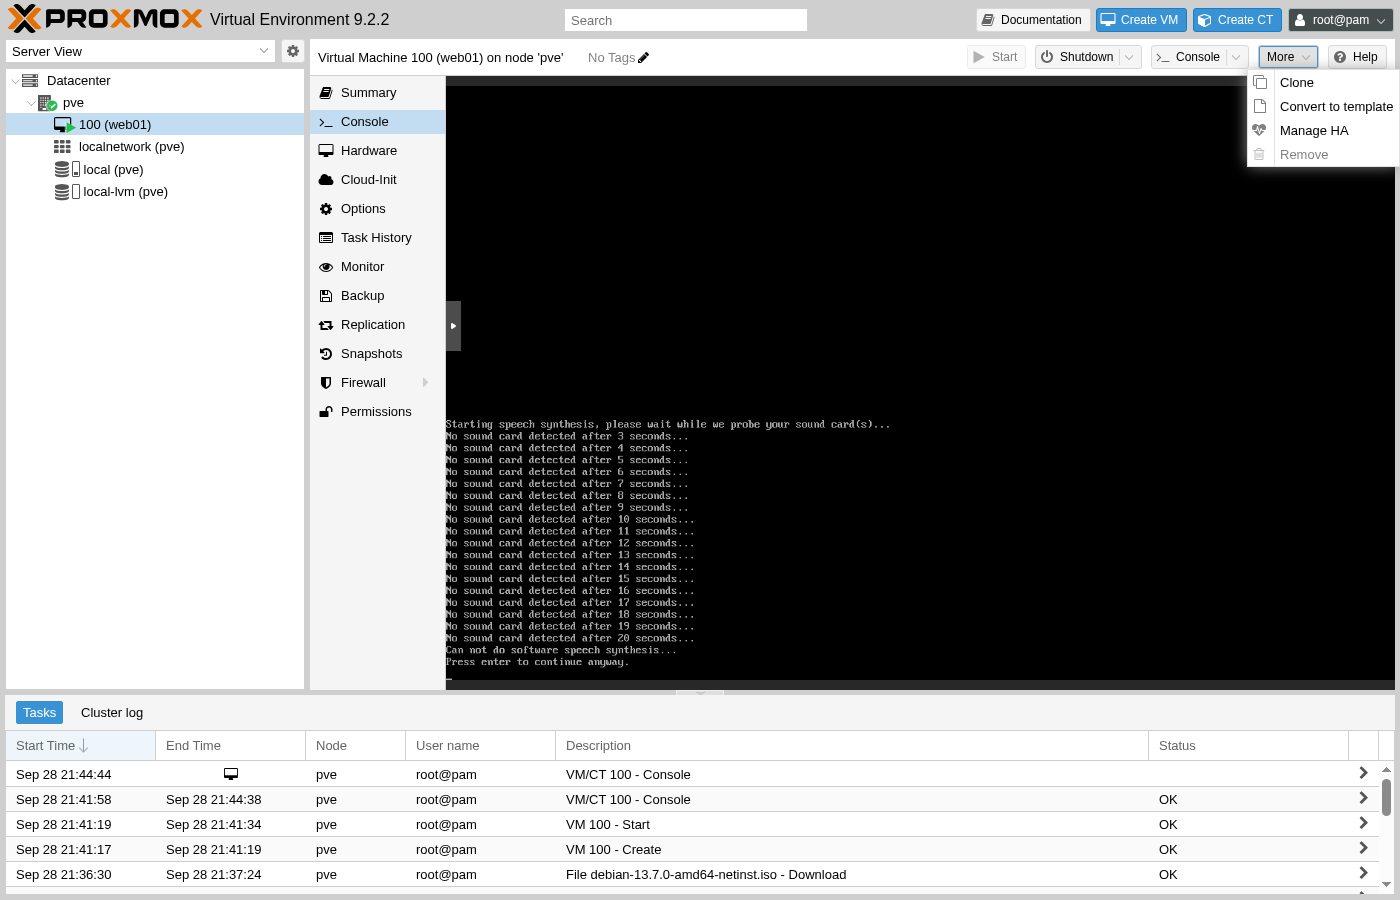
That countdown at the bottom is worth reading rather than ignoring: leaving the menu untouched doesn't just pick the highlighted default, it eventually launches the accessible speech-synthesis install path instead, a noticeably different flow built around audio prompts rather than the usual dialog screens. Pressing any arrow key cancels the countdown and lets the normal Install entry be selected on purpose.
Install the Guest Operating System
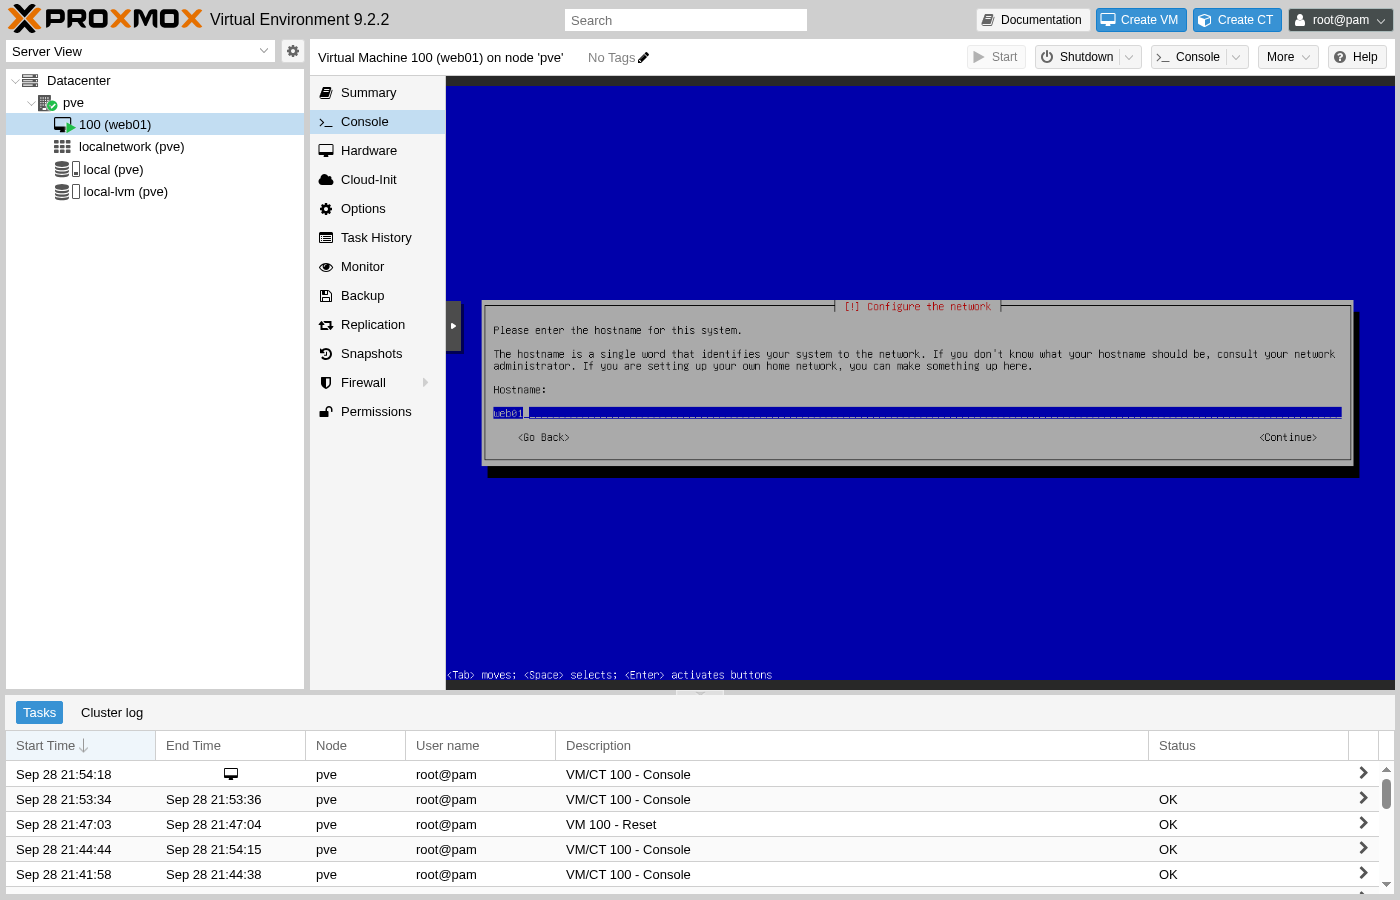
Language, location, and keyboard layout all repeat the same choices made during the Proxmox install itself. The first genuinely new prompt is the hostname, worth setting to match the VM's own name in Proxmox rather than leaving Debian's own placeholder.
Setting up the non-root user account hits a genuine, real validation error worth knowing about in advance: some usernames are reserved by the system itself and rejected outright, no matter how reasonable they sound.
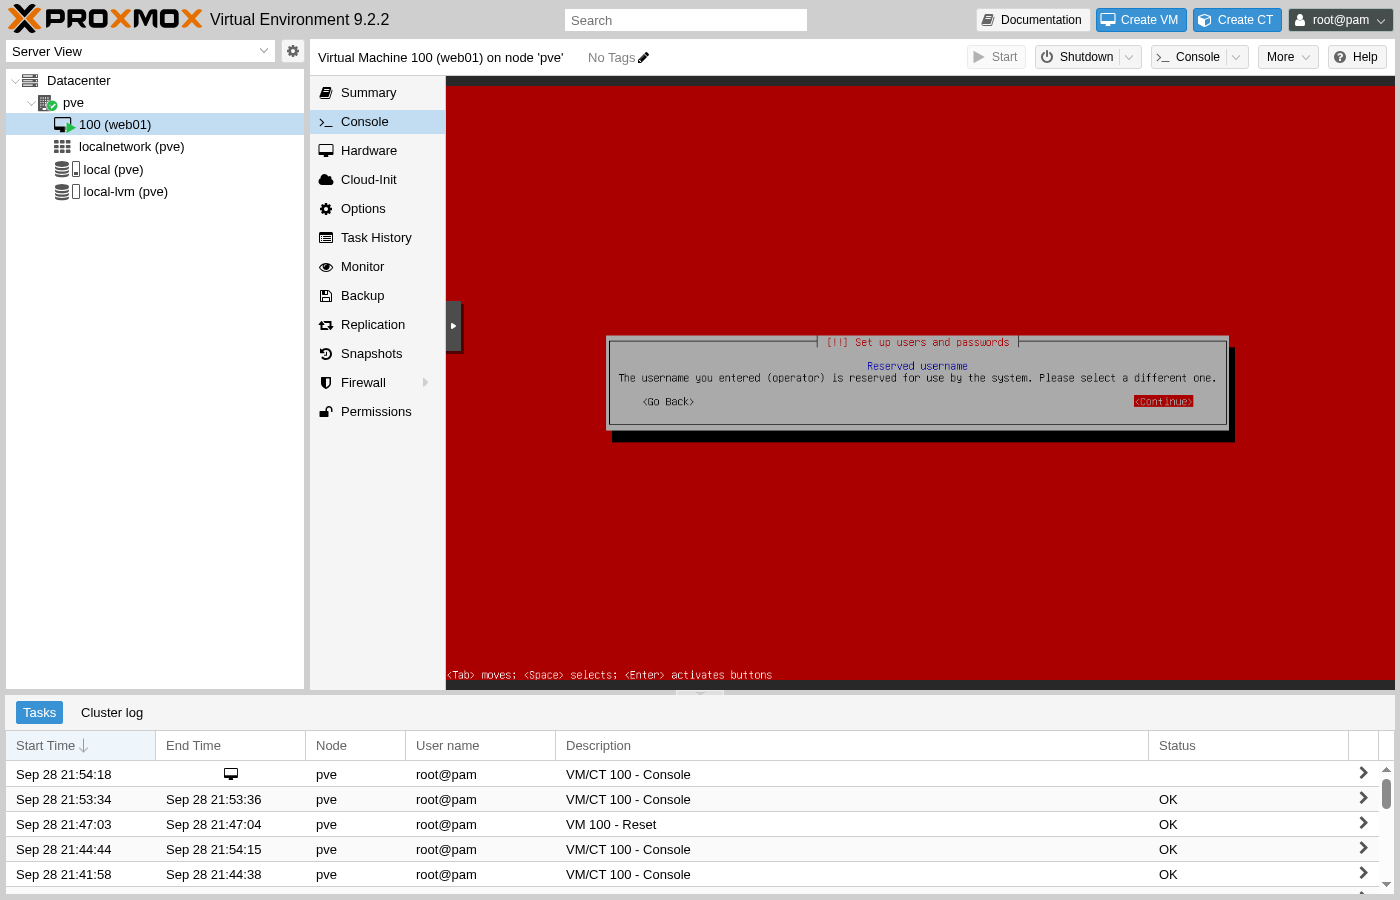
"operator" collides with an actual Unix account historically used for system operations, even though it reads like a perfectly reasonable name to pick for a platform's admin user. "opsadmin", the same name already used for the Proxmox admin account in the previous guide, works without conflict and keeps naming consistent between the hypervisor and the VMs running on it.
Guided partitioning using the entire virtual disk produces a real, working partition table without any manual disk math: an ext4 root filesystem sized to most of the disk, and a swap partition sized from the VM's own RAM.
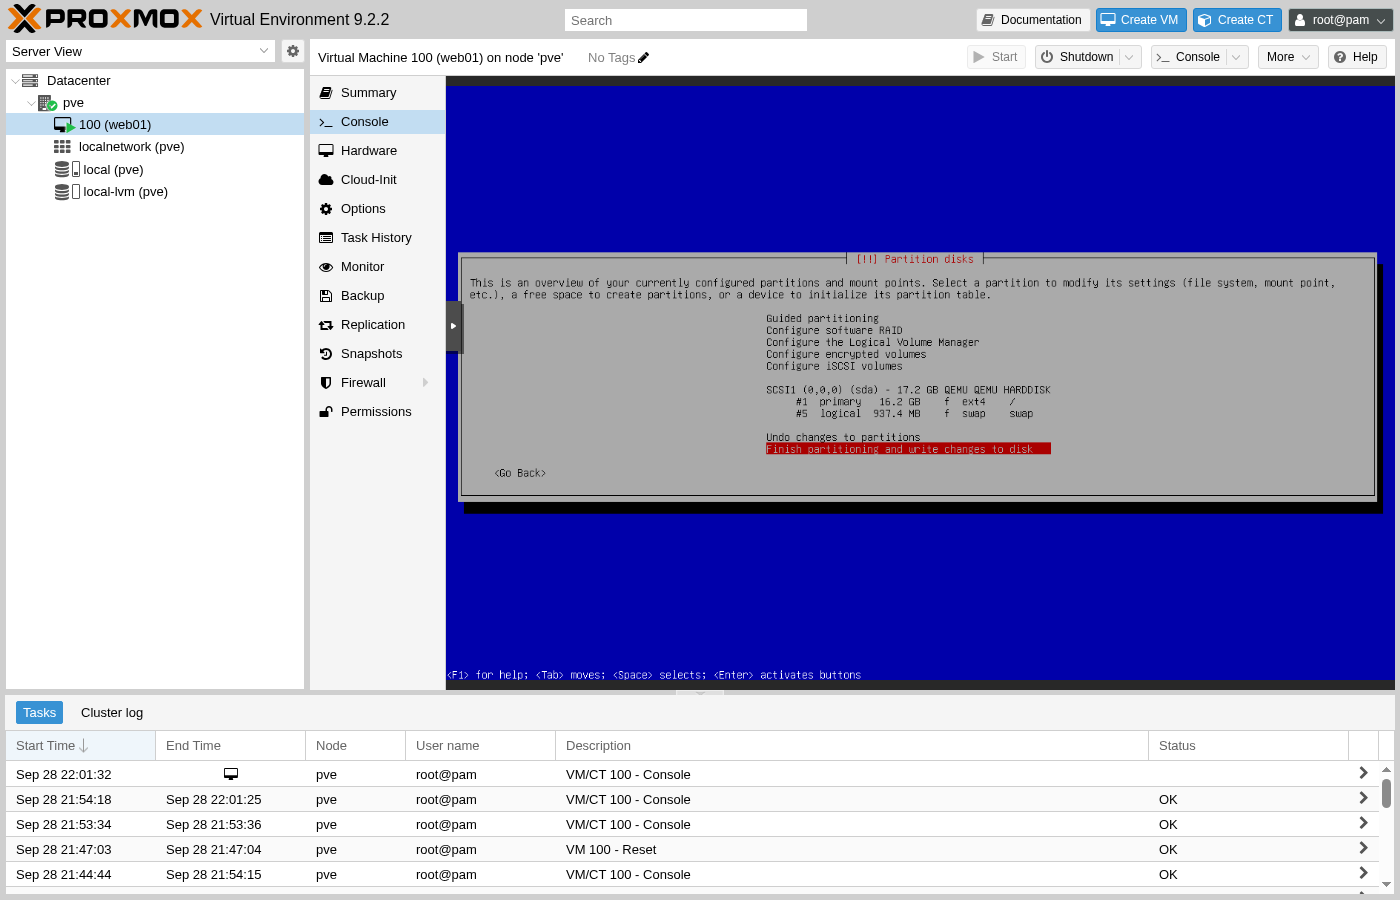
Before confirming this screen: make sure the VM has no data worth keeping on it yet, since guided partitioning erases the entire virtual disk. To check what's actually about to be formatted, the overview screen lists every partition by device and size before anything is written.
Recover From a Bad Archive Mirror
Right after the base system finishes installing, the installer tries to reach a Debian package mirror over the network to configure apt for the rest of the install. That check can genuinely fail, and it's worth knowing what the error actually looks like rather than assuming something is broken beyond repair.
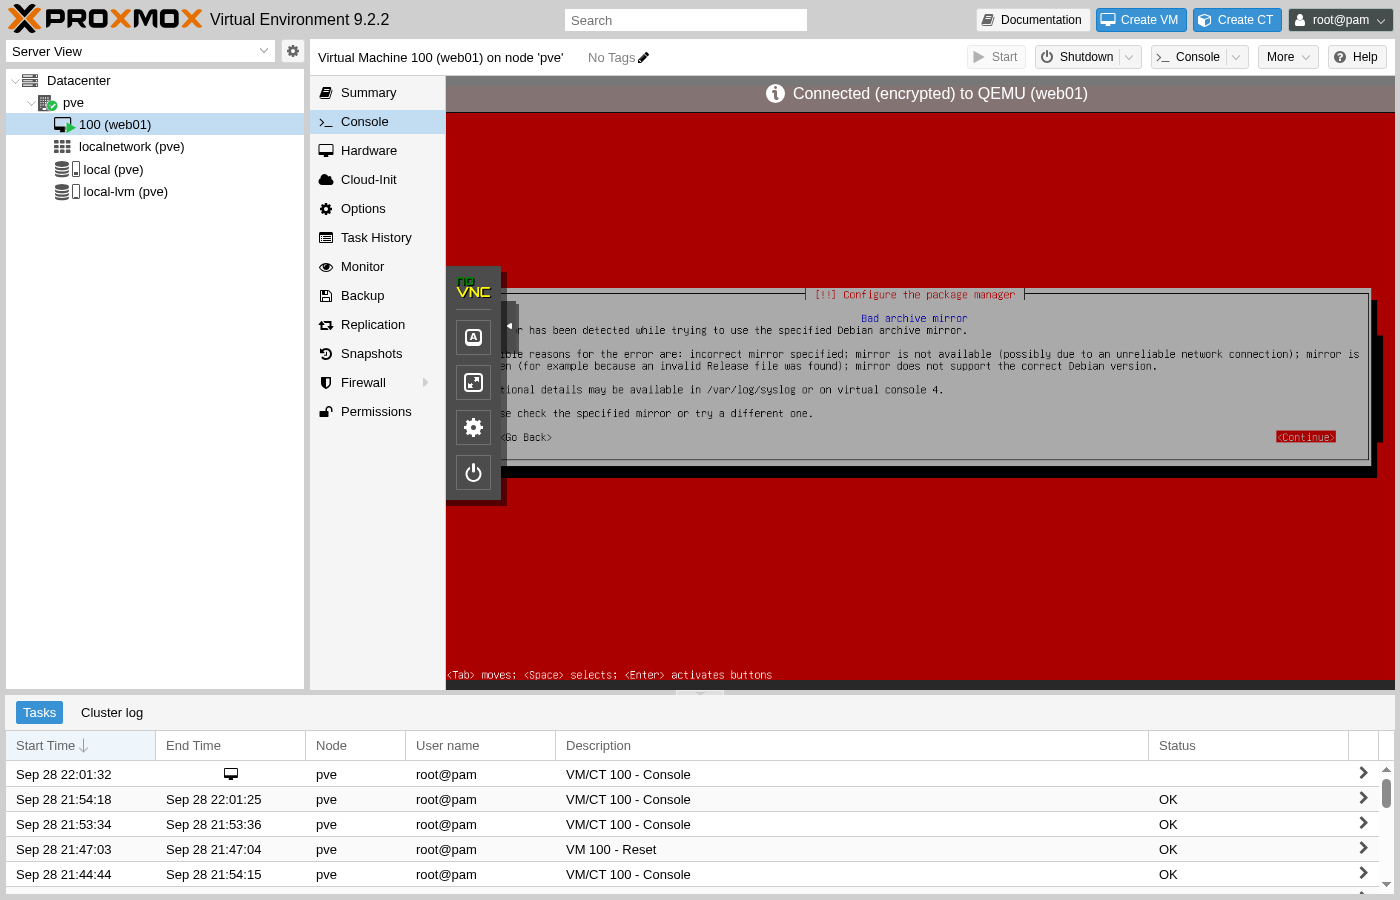
On real hardware, this usually points to something specific to that VM's own path to the internet: a DNS server that isn't actually reachable from inside the guest yet, a firewall rule blocking outbound HTTPS, or simply a mirror that's briefly overloaded and worth retrying a moment later. Going back and picking the same mirror again sometimes succeeds on a second attempt for exactly that reason.
When it keeps failing, the installer itself offers a real way through rather than a dead end: finishing the install without a network mirror at all.
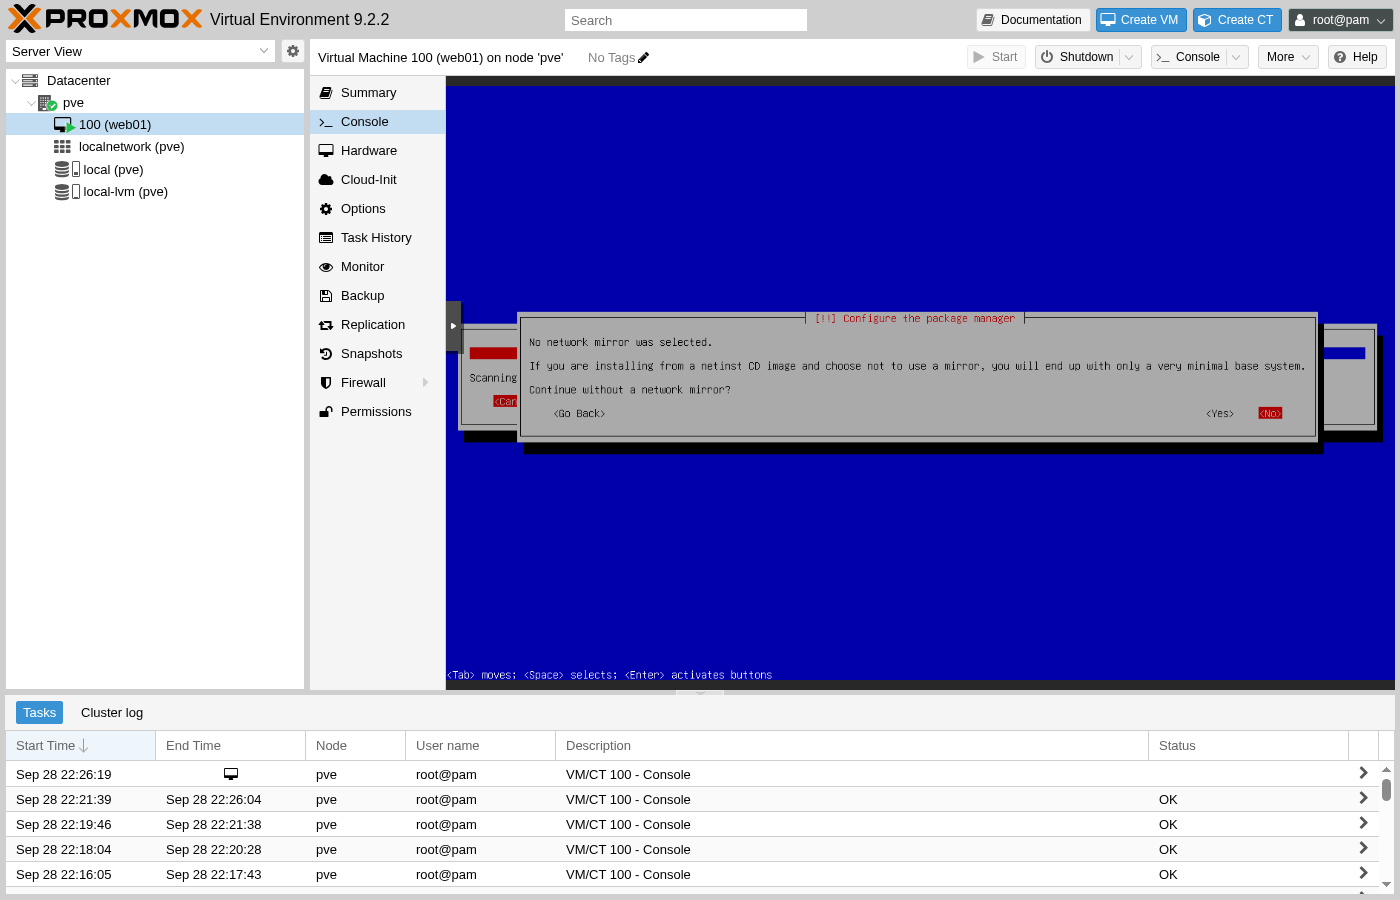
Choosing Yes here trades a fully-featured install for a working one: software selection later on only offers what's already on the netinst image itself, without an SSH server or the guest agent among the choices. Once the installed system boots with real, working network access, a normal apt update against a proper mirror in /etc/apt/sources.list catches everything the installer had to skip.
Finish the Install and Reboot
With no mirror, task selection installs only the standard system utilities already present on the ISO, and the installer moves on to writing GRUB to the disk it was actually installed to rather than guessing.
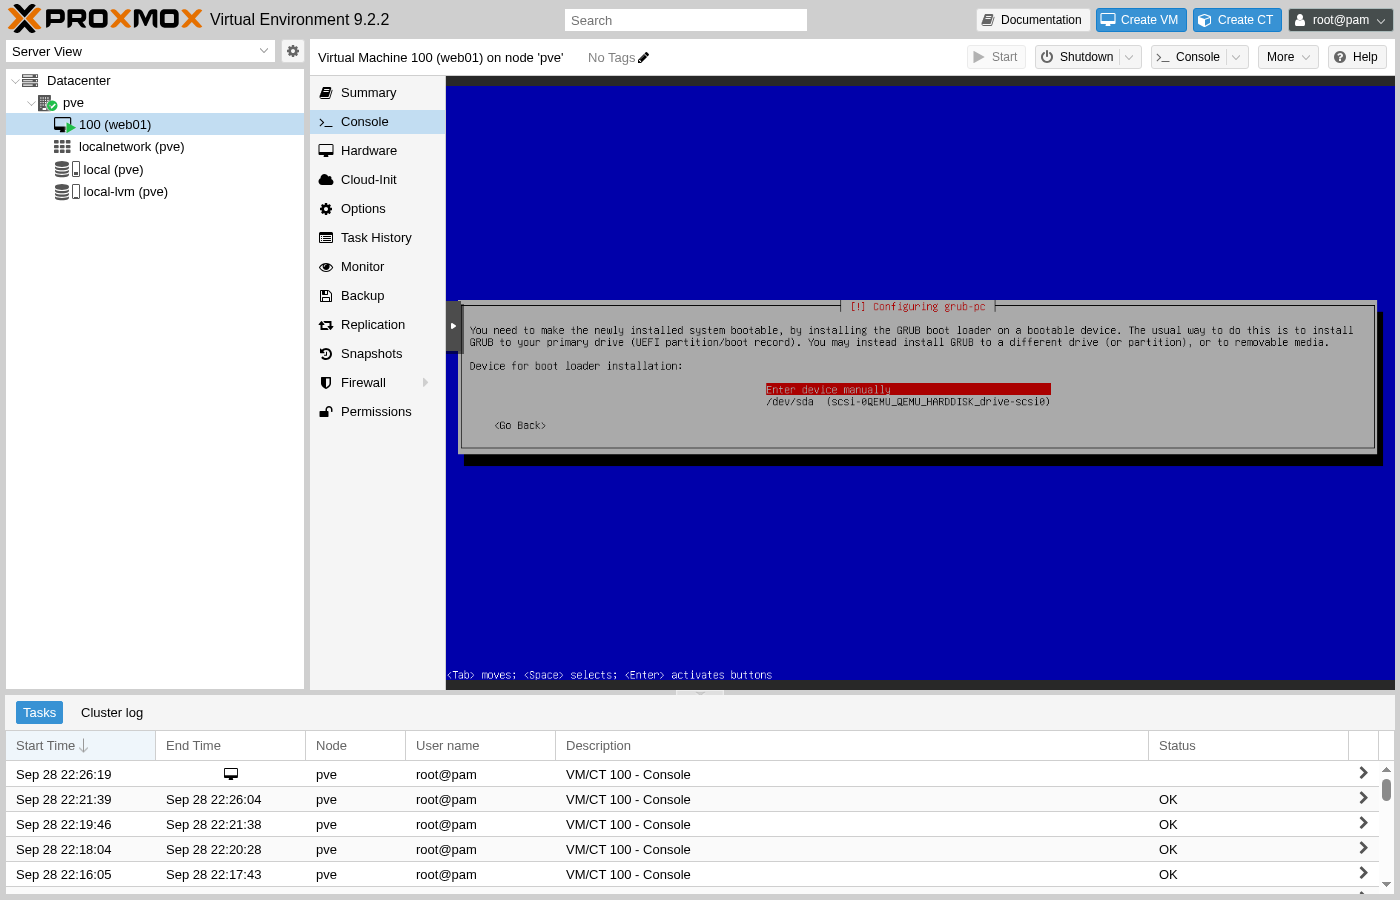
If the installer appears to stop responding right near the very end, on the initramfs or final cleanup step, it's usually safe to use Proxmox's own Reset button once the disk has already been partitioned and the bootloader written. The kernel package's own install already wrote a working initramfs earlier in the process, so a reset at this late stage still boots into a working system rather than an unrecoverable one.
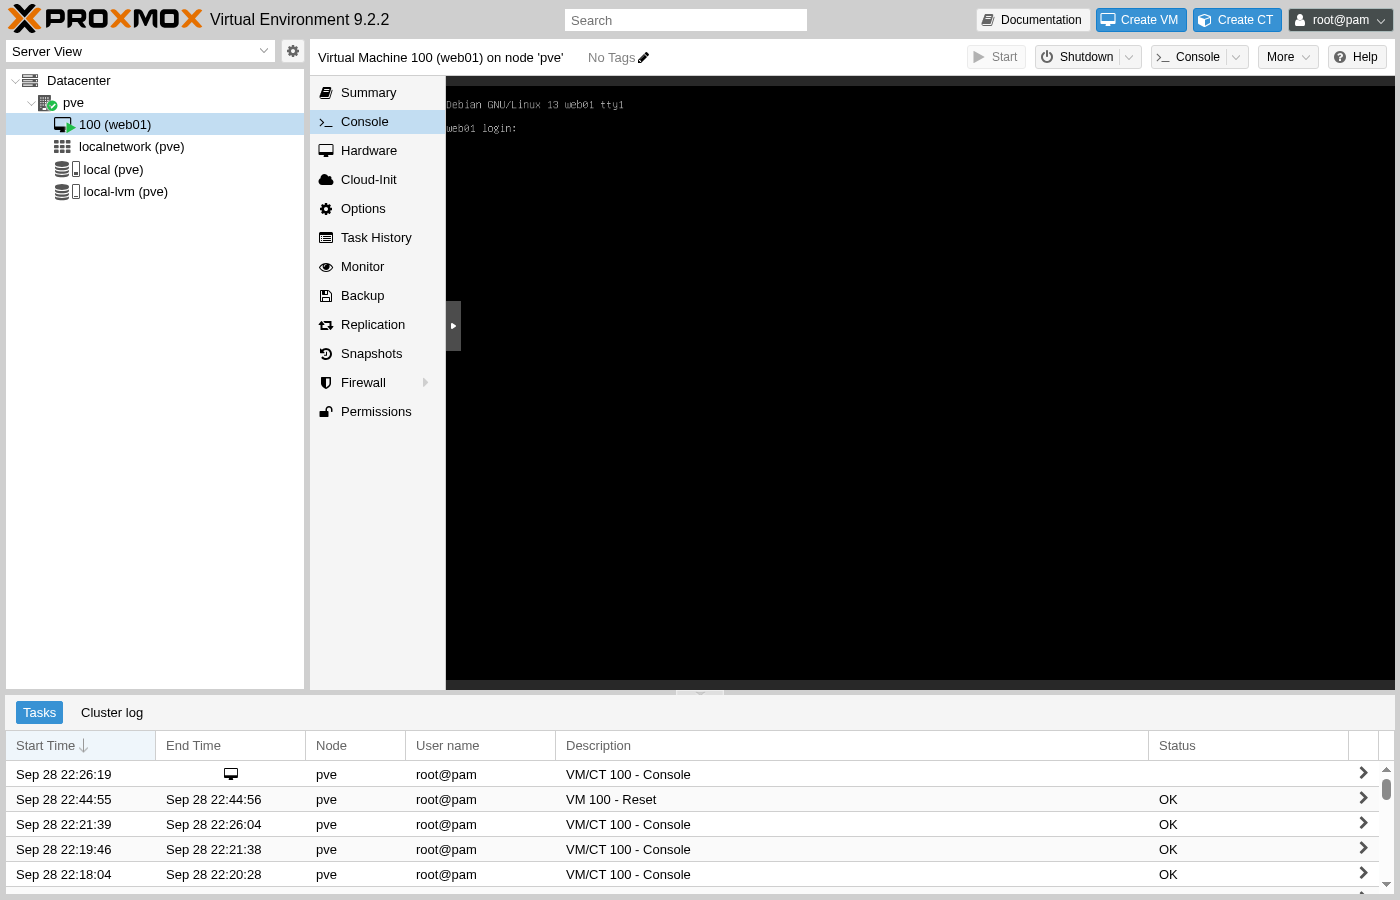
A reboot after that lands on the real, installed system rather than the installer, with a login prompt as proof the whole process actually produced a working guest.
Confirm the Guest Agent Is Running
Checking Qemu Agent back in the System tab only told Proxmox to expect an agent; without a network mirror during install, that agent was never actually installed inside the guest, and neither was an SSH server. Both are a single command away once the guest itself has real internet access, whether that's a corrected /etc/apt/sources.list after a mirror failure or a normal install that had working network access from the start:
apt update
apt install -y qemu-guest-agent openssh-server
Once that agent starts and reports in, Proxmox's own Summary tab stops showing an empty IPs field and starts showing a real address, pulled from inside the guest rather than guessed at from the network layer outside it.
The same information is available over the API, which is what a provisioning script would actually poll instead of waiting on someone to look at the Summary tab:
curl -k "https://pve.example.com:8006/api2/json/nodes/pve/qemu/100/agent/network-get-interfaces" \
  -H "Authorization: PVEAPIToken=opsadmin@pve!automation=<token-secret>"
In summary
- Proxmox can fetch installer images itself over the network, no local upload needed.
- The Create VM wizard's eight tabs collect into one API call, visible in full on the Confirm tab.
- A failed mirror check does not have to stop the install, only defer apt configuration to after the reboot.
- The guest agent and SSH server need installing separately once the VM has real network access.
In the next guide, you'll attach a routed IPv4 address to this VM and confirm it's reachable from the internet.